Have you recently attempted to connect to another system remotely via Windows Server, and an error message appears stating that “Account Restrictions Are Preventing This User From Signing In?” This issue is fairly common, and there are several possible causes for this error. However, the main cause is usually related to the Windows group policy.
This policy prevents users from exposing credentials to the remote host. Additionally, a blank password may be the cause. These issues are easy to fix, and we will highlight the three best solutions to help you get rid of this error.
Causes of the ‘Account Restrictions are Preventing this User from Signing In’ Issue

This error can be caused by various factors, with some causes being more common than others. Let’s look at two possible causes of this error.
- No Password: The account restriction error message may also appear if the user account used to create a remote connection does not have a password. You need to set a password or disable this policy if this is the case.
- Windows Group Policy: Some of your computer’s actions are controlled by Windows policies. This error message could be caused by a Windows Group Policy that prevents the Remote Desktop Client from exposing sign-in details to the remote host. Disabling the policy appears to resolve the problem.
Now that you’re aware of the possible causes of the account restriction locking you out, you can narrow down what the issue is and try out the changes we will discuss below.
Solution #1: Set User Account Password
The first solution to try is to create a password for the user account that will be used to log in to Remote Desktop. The steps to fixing this issue include:
Step 1: Right-click This PC and choose Manage.
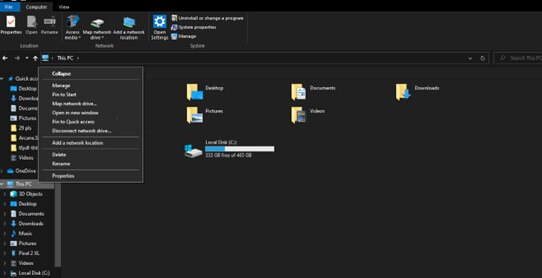
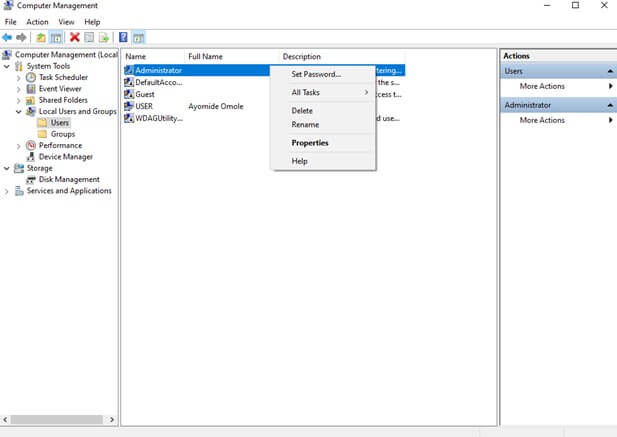
Step 2: Then, under System Tools in Computer Management and then on Local Users and Groups.
Step 3: You should find Users and right-click the user account to connect to a remote desktop.
Step 4: After that, click Set Password. Then, for the selected user account, enter a password.
Solution #2: Edit the Value Data On Registry Editor
You can make further changes with the Registry Editor and then connect to the computer remotely by logging in to the user account that does not have a password.
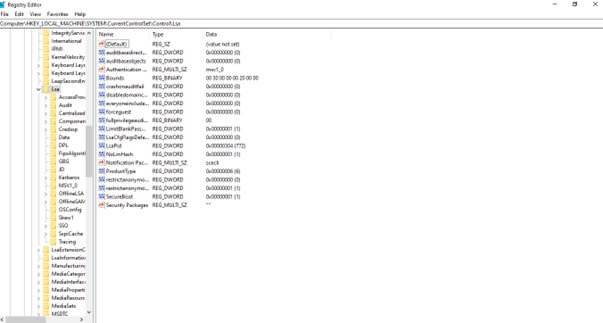
Step 1: Enter regedit into the Start Search box or on the computer’s Run Dialog. Then, click on the Registry Editor.
Step 2: Go to the HKEY LOCAL MACHINESYSTEMCurrentControlSetControlLsa key.
Step 3: On the right pane, double-click LimitBlankPasswordUse and Set the value data to 0. Lastly, click OK to confirm.
Solution #3: Disable Limit Blank Password On Local Group Policy Editor
After setting a password, you must input the password every time you log in with the user account. You can disable the password check to enable Remote Desktop Connection to log in without a password.
Step 1: In the Start Search box, type gpedit.msc and press Enter. Alternatively, you could input the text in the Run dialog (press the Windows key + R to open). Then, click the Microsoft Common Console Document.
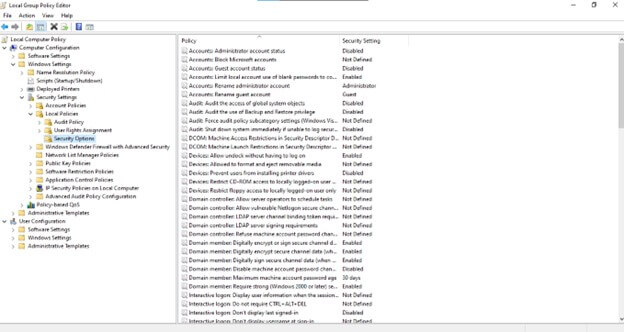
Step 2: In the left pane, navigate to Computer Configuration and select Windows Settings.
Step 3: Then click on Security Settings from the options, select Local Policies, then click on Security Options.
Step 4: Go to Accounts: Limit local account use of blank passwords to console logon only and double-click. This option is enabled by default, and you must click on Disable and select OK to disable it.
Conclusion
This issue can restrict you from assessing a Windows server. Luckily, we have thoroughly discussed the possible causes and highlighted three quick solutions. So, follow our guide to remove this account restriction and enjoy full access when connecting to a target system.
Frequently Asked Questions
This message appears when an anti-malware software updates during Windows startup and scans the computer’s boot tracks. It’s best to allow time for the program to finish its scan before logging off and back on.
If you have a new laptop or installed a new OS, the default user will be used if none exists. Otherwise, you’ll see an account switcher, allowing you to switch between accounts. However, if you are logged in to a user account, you can restart your computer, log out, switch users, or lock your computer.
To change the user. Open the start menu, select your account name, and then select Switch user. To lock your computer, press the Windows key + l. If you’re using Windows 7, go to the start menu, click the arrow next to the shutdown button, and then select an option.
The most obvious cause is that the Product Key used to activate your Windows edition is no longer valid. Check for typos when inputting the product key. This is a common mistake by users. Moreover, it is risky to obtain the product key from untrusted sources.
If you have a Microsoft account set up on a Windows 10 computer, you’ll be able to switch to a local account. Here’s how:
• Sign in using your Microsoft Account.
• Select Settings from the Start menu.
• Navigate to Accounts, click Your Email and Accounts. Then, Sign in with the local account instead, and the Switch to a local account prompt will appear.
• Afterward, input your Microsoft account credentials on the wizard.
• Select Next. On the next page, enter your name in the “Username” field.
• Ensure you input a strong password as well as a password hint.

