
One of the most effective ways to resolve any Windows update issues is to run the Windows Update Troubleshooter. However, an error can cause the troubleshooter to get stuck on pending for too long. This issue is mainly due to software issues, Windows bugs, and errors or malware.
If you can’t install new system updates, you expose your PC to more bugs and miss out on new features. As a result, the problem must be quickly resolved. For example, if your Windows 10 update status has been pending for an hour, you may need to implement a couple of fixes. Continue reading to learn the five most effective methods for fixing this issue.
Causes of the “Windows Update Troubleshooter Checking For Pending Restart”
Windows consistently comes up with many new features that enhance usability and productivity. However, this OS also has its fair share of errors and bugs.
Most update errors have no apparent cause and can arise for several reasons. An example is the Windows Updater stuck on the “Pending” status. The most common causes of this issue are:
- Software issues
- System bugs
- Malware or other issues on the computer
Read on to find out all the best fixes for this issue.
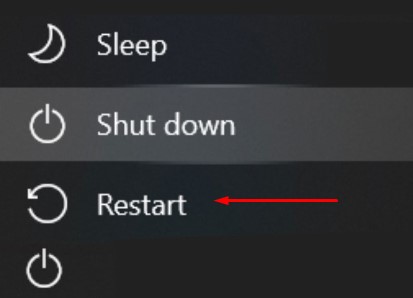
Solution 1: Restart the Computer
Firstly, you should try restarting your PC to see if it resolves this issue. A quick restart can remove any bugs affecting the updating process. To restart your computer:
Step 1: Click on the Windows icon on the bottom left of your screen. Step 2: Select the Power option and Click on Restart.
If a quick restart doesn’t fix this issue, try the other solutions listed below.
Solution 2: Install the Windows Update Manually
If the problem isn’t resolved after the first solution, you can fix it by manually installing the update. Here are the steps involved:
Step 1: Press the Windows key + I simultaneously. The “Settings” window should pop up. Afterward, select “Update & Security.”
Step 2: Next, select “Windows Update” from the left-hand menu.
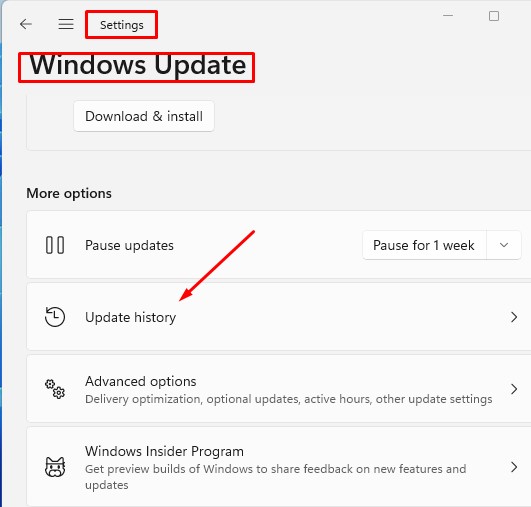
Step 3: Then, select the “View update history” option. Locate the particular update that is causing the error. Then try manually downloading and installing the update.
If the issue persists, try the other solutions below.
Solution 3: Run the Media Creation Tool
You can also use the Windows Media Creation Tool to resolve the problem. Here are the several steps involved.
Step 1: Download the Windows installation media from the Microsoft website.
Step 2: Next, double-click the downloaded file and choose “Yes” from the “User Account Control” interface that appears.
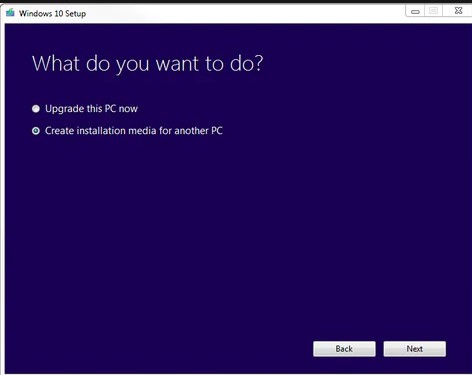
Step 3: The “Windows Setup” window will pop up on the screen. Click the “Accept” button to continue.
Step 4: At this point, you’ll need to choose between two options. “Create installation media” or “Upgrade this PC.” Select “Upgrade this PC now.” Then press the “Next” button to start the upgrade.
Step 5: Once the upgrade is complete, click “Accept” to authorize the Windows Setup to make the necessary changes.
Step 6: Afterward, your PC will receive updates, which might take minutes to complete.
Step 7: It would be best to select “Keep personal files and apps” and click on “Next.”
Step 8: Then, select “Install” to finish the upgrade. The process may take some time to complete.
Solution 4: Toggle the “Download Updates Over Metered Connection” Option
Some Microsoft updates may require users to switch these settings before downloading updates.
Step 1: Open the Start menu by clicking on the Windows logo in the bottom left corner of your screen. Then, select the gear icon to open Settings.
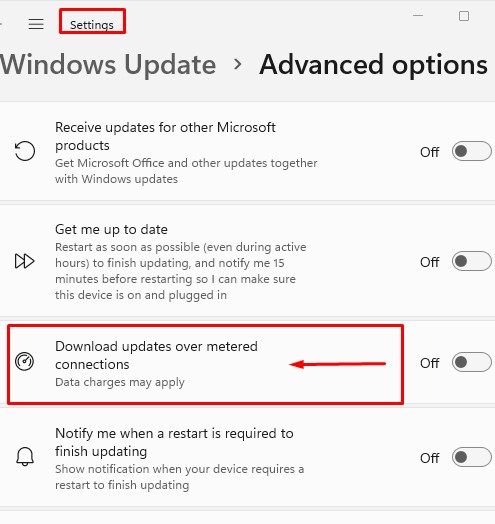
Step 2: Afterward, select the “Update and Security” option and select “Advanced options.”
Step 3: Locate the “Download updates over metered connections” tab and toggle the switch. However, if it is already set at “Off,” you can disregard this fix.
Step 4: Lastly, reboot your PC and try installing Windows once more. You can toggle the switch to your previous configuration if the update is successful.
Solution 5: Modify Group Policy Settings to Allow the Automatic Updates
Users can fix this issue by modifying settings on the Group policy. Here are the steps involved:
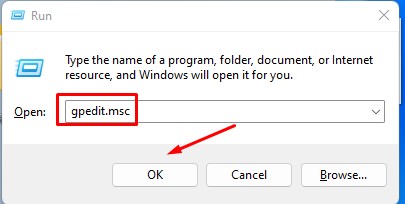
Step 1: Press the Windows key + R keys to open the Run utility.
Step 2: Type “gpedit.msc” and press “Enter.” The Group Policy window should open immediately.
Step 3: Go to “Computer Configuration“, locate “Admin Templates,” then click on “Windows Components” and select “Windows Update.”
Step 4: Select the “Configure Automatic Updates” option.
Step 5: Ensure that Enabled is selected in the upper left corner of the window. Then, select “Auto download and notify for install from the drop-down menu.”
Step 6: Close the Group Policy editor by clicking the Apply button. Restart your computer and see if the issue is resolved.
Conclusion
This issue can make updating your Windows near impossible. As a result, you may not be able to enjoy new features and bug fixes in the previous version. Follow any of our five solutions to resolve this issue and update your Windows version to enjoy all the latest features.
Frequently Asked Questions
If you’re having trouble installing an update, try the following:
Verify that your computer is connected to the Internet. Some updates cannot be installed if your Internet connection is metered.
If your computer is connected to the Internet and updates aren’t being installed automatically, wait a couple of minutes before attempting to install them manually.
Use the Windows Update Troubleshooter to try to resolve the issue.
The time it takes to download updates is affected by various factors, such as network settings, the update size, and internet speed. Ensure your computer is plugged in and properly connected to the Internet to reduce the time it takes to download Windows updates.