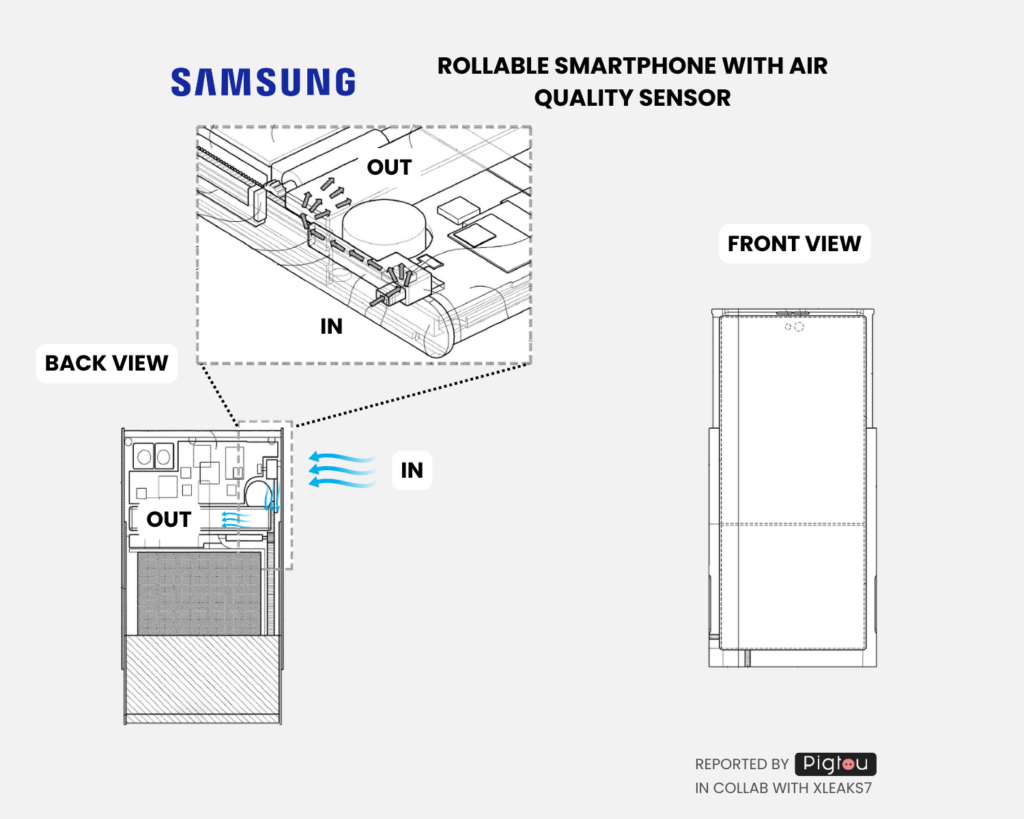
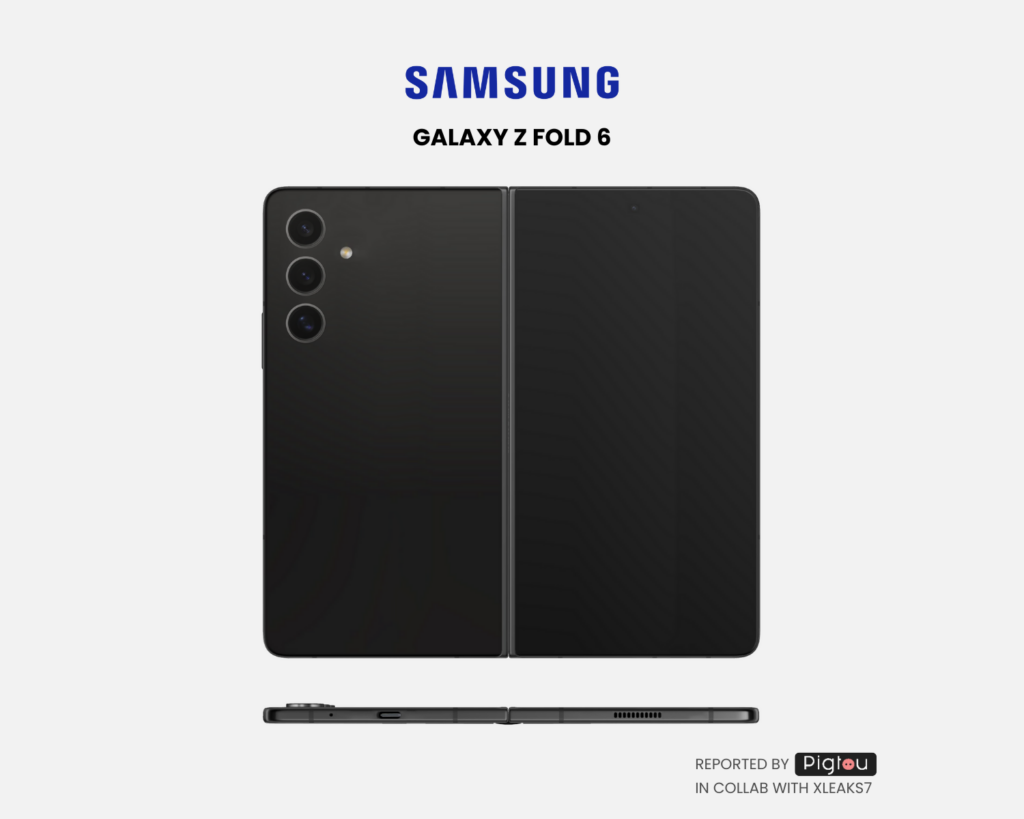
Pigtou Tech Blog
TRENDING
No Result
View All Result
  • Tech Reviews
  • Guides and How To’s
  • Malware Removal
  • News
  • Software
  • Gaming
SUBSCRIBE
  • Tech Reviews
  • Guides and How To’s
  • Malware Removal
  • News
  • Software
  • Gaming
No Result
View All Result
Pigtou Tech Blog
No Result
View All Result
Home Malware

How to Remove js:agent-egf [adw] Virus (Tested Solutions)

Pigtou Team by Pigtou Team
October 20, 2022
in Uncategorized
Reading Time: 16 mins read
How to Remove jsagent-egf [adw] Virus (Tested Solutions)

Our researchers have researched and curated a detailed guide on removing js:agent-EGF [adw]. Get rid of it today.

1
SHARES
44
VIEWS
Share on FacebookShare on Twitter

Pigtou.com is supported by its audience. When you buy through the links on our website, we may earn a small commission.

There are only a few viruses as frustrating as the js:agent-EGF [adw] malware. This malware significantly slows down the performance of one’s computer by performing a series of harmful activities. While there are manual and automatic ways to remove this malicious virus, only a few are reliable. 

If you want to eliminate this virus easily without using complex manual methods, then you must consider using the Spy Hunter software. This antivirus detects and eliminates all kinds of malware automatically. It will also ensure they never return to your PC. Continue reading to learn more about removing js:agent-egg [adw]. 


Is js:agent-egf [adw] Malware or False Positive?

js:agent-EGF [adw] is a type of malware categorized under Trojan Horse. This malware is one of the most dangerous threats a computer user can encounter. It uses Javascript to execute its activities. The js:agent-egf [adw] virus usually enters the computer by visiting hacked or malicious websites. Some users also reported that they got this malware through harmful attachments in spam emails. Some of the damages this virus can cause your PC includes: 

  • Slowing down the performance of your PC. 
  • Causing random computer restarts. 
  • Downloading other harmful trojans into your computer. 
  • Stealing personal and confidential information or data. 


Automatic Way to Remove js:agent-egf [adw]

Numerous antiviruses can detect viruses. However, these antiviruses, particularly the free ones, can’t eliminate them from your computer completely. Spy Hunter, on the other hand, is an effective antivirus that will detect and remove the js:agent-EGF [adw] malware from your computer. 

Spy Hunter was built using an up-to-date database. Its developers also update this database regularly to detect and eliminate recent threats. For a dangerous trojan horse like js:agent-EGF [adw], Sky Hunter remains the best antivirus to remove it from your computer entirely. Use these simple steps to download, install and run the Spy Hunter software. 


Step 1: Click this link to download the Spy Hunter software. Then, open it from your download history.


Step 2: A User Account Control icon will appear on your screen. Select “Yes” to proceed with the installation. 

Step 3: Choose the language you prefer and click on Continue.

Step 4: Accept the Privacy Policy and End User License Agreement and click on Install.

Step 5: After installing, click on the Finish icon. You will then either add your information or accept the default information. 

Step 6: To open the app on your computer, search for Spy Hunter on your homepage’s search bar. 

Step 7: Click on Start Scan Now. The Spy Hunter software will locate viruses on your PC automatically.

jsagent-egf [adw]


Step 8: After Spy Hunter has completed its scan, all the viruses on your computer will be exposed, including the js:agent-EGF [adw] trojan. Finally, click on the Delete button to remove all of them. 


The Most Advanced Guide to Remove js:agent-egf [adw] Manually (Proceed with Caution!)

If you decide to remove malware manually, follow our step-by-step guide below. Note that this process takes 20-30 minutes and requires some technical skills. If you do not follow our steps carefully, this may damage or corrupt your Windows system, and you will end up paying more to reinstall the system and recover your data than getting malware removal software in the first place.


Before Proceeding to Solutions, You Need to Enter a Safe Mode


Step 1. Search for ‘Recovery Options‘ > Recovery > Advanced start-up > Restart now

Before Proceeding to Solutions, You Need to Enter a Safe Mode - Advance options#1


Step 2. Then in Choose an option menu go to Troubleshoot > Advanced options > Startup Settings > Restart

Step 3. Once restarted, select Safe Mode with Networking and press Enter


Now let’s proceed to malware removal steps… Please follow our exact order of solutions to have a higher chance of success.


Solution #1 – Delete Suspicious Tasks in Task Scheduler


Step 1. Go to Control Panel > Administrative Tools > Task Scheduler

Step 2. Open the Task Scheduler Library folder and delete suspicious tasks

Solution #1 - Delete Suspicious Tasks in Task Scheduler
Delete suspicious tasks in Task Scheduler / Image credit: Pigtou


TIP: if you don’t recognize suspicious tasks, filter by ‘Created’ date and check the latest created tasks. Also, suspicious tasks might have a missing Author.


Solution #2 – Delete Suspicious Programs in Programs and Features


Step 1. Go to Control Panel > Programs and Features

Delete Suspicious Programs in Programs and Features - control panel - program
Open Programs and Features / Image credit: Pigtou


Step 2. Sort by ‘Installed On‘ date and delete suspicious programs

Solution #2 - Delete Suspicious Programs in Programs and Features
Delete suspicious programs in Programs and Features / Image credit: Pigtou


TIP: Think about what programs were installed just before your PC got infected.


Solution #3 – Delete Suspicious Files from Task Manager


Step 1. Open Task Manager and go to the Details tab

Step 2. Search for suspicious processes

Step 3. Right-click on suspicious process > Open file location, and delete the file or whole folder

Delete suspicious processes in Task Manager / Image credit: Pigtou


Step 4. Get back to Task Manager and end the suspicious process

Step 5. Then search the Startup tab for suspicious processes > Open the file location, and delete the file or whole folder

Delete suspicious startup processes / Image credit: Pigtou


TIP: If ‘Access is denied’ and you’re unable to delete files, search for Resource Monitor (run as administrator), open and end the process in the Overview tab, then try to delete a file.


Solution #4 – Delete Suspicious Registries from Registry Editor


Step 1. Open Registry Editor (Run as administrator)

Solution #4 - Delete Suspicious Registries from Registry Editor - Open Registry Editor
Run Registry Editor as administrator / Image credit: Pigtou


Step 2. Delete suspicious registries from: 

Computer\HKEY_CURRENT_USER\SOFTWARE\Microsoft\Windows\CurrentVersion\Run
Computer\HKEY_CURRENT_USER\SOFTWARE\Microsoft\Windows\CurrentVersion\RunOnce locations

Delete suspicious records in Run and RunOnce locations / Image credit: Pigtou


Step 3. Then select Computer and go to Edit > Find, and search Registry by names of suspicious files you remember from previous steps

Search for suspicious records / Image credit: Pigtou

TIP: You can easily delete suspicious registries from Run and RunOnce folders, however, be careful with deleting registries from other folders. This can break your system.


Solution #5 – Disable Suspicious Services in System Configuration


Step 1. Search for Run and type msconfig, then open the Services tab

Disable Suspicious Services in System Configuration - run diag
Type msconfig in Run / Image credit: Pigtou


Step 2. Tick ‘Hide all Microsoft services‘

Solution #5 - Disable Suspicious Services in System Configuration
Disable suspicious services in System Configuration / Image credit: Pigtou


Step 3. Then search a list for suspicious services and untick them


TIP: Missing or unknown Manufacturer can be a good sign of suspicious service


Solution #6 – Delete Temporarily Files


Step 1. Search for Run and type %temp%

Delete Temporarily Files - temporary files
Locate Temp folder and delete everything inside / Image credit: Pigtou


Step 2. Delete everything in the Temp folder

Step 3. Empty Recycle Bin


TIP: all temporary files can be deleted without hesitation. It will not damage your system.


Solution #7 – Check Hosts File


Step 1. Go to C:\Windows\System32\drivers\etc, and open the hosts file as Notepad

Step 2. Delete everything below ‘# ::1 localhost‘

Solution #7 - Check Hosts File
Delete suspicious records in Hosts file / Image credit: Pigtou


TIP: If a record doesn’t have ‘#’, this is definitely a suspicious record that should be deleted.


Solution #8 – Clean Browsers


Step 1. Search for your browser, right-click and open file location

Step 2. Then right-click on the browser icon and open Properties

Step 3. Delete everything after exe” in Target (for example, Google Chrome’s target should end with chrome.exe”)

Solution #8 - Clean Browsers' Target in properties
Verify Target in browser properties / Image credit: Pigtou


Then you need to open your browser, delete suspicious extensions, notifications, and reset settings to defaults.


• Google Chrome:


Delete suspicious extensions: Settings > Extensions

Google Chrome - extension
Delete suspicious extensions in your browsers / Image credit: Pigtou


Remove suspicious notifications: Settings > Privacy and security > Notifications, then remove suspicious notifications under ‘Allowed to send notifications‘

Reset settings to defaults: Settings > Reset and clean up > Restore settings to their original defaults > Reset settings


• Mozilla Firefox:


Delete suspicious add-ons: Menu > Add-ons and themes

Remove suspicious notifications: Menu > Privacy & Security > Notifications > Settings…, then remove websites you do not want to receive notifications from

Reset settings to defaults: Menu > Help > More troubleshooting information > Refresh Firefox > Refresh Firefox


• Opera:


Delete suspicious extensions: Click on Opera icon > Extensions > Extensions

Remove suspicious notifications: Click on Opera icon > Settings > Advanced > Privacy & security > Site Settings > Notifications, then under ‘Allowed to send notifications’ remove websites you do not want to receive notifications from

Reset settings to defaults: Click on Opera icon > Update and recovery > Recover


• Microsoft Edge:


Delete suspicious extensions: Menu > Extensions

Remove suspicious notifications: Menu > Settings > Cookies and site permissions > Notifications, then under ‘Allow‘ remove websites you do not want to receive notifications from

Reset settings to defaults: Menu > Settings > Reset settings > Restore settings to their default values > Reset


Solution #9 (Optional) – Follow This Solution if Your Browser Does Not Open Any Websites


If your browsers do not open any websites while other software can connect to the internet properly, you need to check internet properties:

Step 1. Go to Control Panel > Internet Options > Connections > LAN settings

Follow This Solution if Your Browser Does Not Open Any Websites lan options
Open LAN settings / Image credit: Pigtou


Step 2. Tick ‘Automatically detect settings’ and untick ‘Use a proxy server for your LAN’

Disable 'Use Proxy for LAN'
Disable proxy server for LAN / Image credit: Pigtou


Step 3. Then disable proxy servers in the browser if connection wasn’t restored yet


• Check AppInit_DLL in Registry


Step 1. Open Registry Editor (Run as administrator)

Step 2. Go to Edit > Find, search for AppInit_DLLs

Step 3. Open the AppInit_DLLs file and make sure Value Data is empty (don’t remove records starting with “SYS:”)

Check Value Data in AppInit_DLL / Image credit: Pigtou


Step 4. If Value Data contains a path to any DLL file, follow that path, find and delete that DLL file, and clean Value Data in AppInit_DLLs file.


TIP: DLL file may be hidden in the destination folder. In that case, change the folder setting by going to View > Options > Change folder and search options > View, then select ‘Show hidden files, folders and drives’


• Check DNS servers


Step 1. Go to Control Panel > All Control Panel Items > Network and Sharing Centre, then click on your Connection

Check DNS servers - find your connection
Find your connection / Image credit: Pigtou

Step 2. Open Properties > Internet Protocol Version 4 (TCP/IPv4)

Step 3. Select ‘Use the following DNS server addresses’ and enter 8.8.8.8 to Preferred DNS server and 8.8.4.4 to Alternative DNS server

Update DNS servers / Image credit: Pigtou

Step 4. Then open Command Prompt and enter the following commands: ipconfig /flushdns then route –f (these commands will clean DNS cache)

Flush DNS cache / Image credit: Pigtou


Solution #10 (Optional) – Restore the Windows


If the steps above do not remove malware, you can restore your Windows to the earlier point. This will not affect your pictures, documents or personal data, but some programs or drivers might be uninstalled.

Search for Create a restore point > System Restore… > Next > Select a date you want to restore your system to > Next > Finish

Solution #10 (Optional) - Restore the Windows
Restore system to the earlier settings / Image credit: Pigtou


You may also need to decrypt or recover your personal files.


Final Thoughts

The js:agent-EGF [adw] is a malicious trojan horse, which can severely damage your computer. So, you must remove it immediately to avoid further damage. We recommend the Spy Hunter software if you want to remove this trojan horse quickly. 


FAQs

How to Remove js:agent-egf [adw]?

We recommend removing js:agent-EGF [adw] automatically via Spy Hunter or following our manual malware removal guide in this article. 

How Has The js:agent-EGF [adw] Malware Infected My PC? 

The most common way this virus enters one’s computer is through visiting hacked websites. It can also infect your PC through malicious attachments in spam emails. 

ShareTweet

Related Posts

Fixing Toshiba Factory Reset 0 Not Working
Guides and How To's

Fixing “Toshiba Factory Reset 0 Not Working”

March 9, 2023
How To Fix The Windows Update Troubleshooter Checking For Pending Restart 5 Solutions
Guides and How To's

How To Fix The Windows Update Troubleshooter Checking For Pending Restart? (5 Solutions!)

July 26, 2022
Best laptop for Day trading (Find out here)
Uncategorized

Best Laptop for Day Trading (Products and Their Requirements)

September 23, 2022
Next Post
How to Remove gogo.thepowerrangers.com Virus (Actionable Guide)

How to Remove gogo.thepowerrangers.com Virus (Actionable Guide)

Recommended

best free fax app for iphone

Best Free Fax App For iPhone

September 22, 2022
Is a Laptop Useful for Medical Students (Helpful Examples)

Is a Laptop Useful for Medical Students (Helpful Examples)

September 22, 2022
Easy Ways to Fix The Err_Unsafe_Port Error. 3 Solutions

Easy Ways to Fix The “Err_Unsafe_Port Error” (3 Solutions)

July 27, 2022
How To Remove The Httproutercsrf-a Malware Attack (Quick Fix!)

How To Remove The Http:routercsrf-a Malware Attack (Quick Fix!)

September 9, 2022
Best Spy Apps for SMS Tracking (Our Top 5 Picks)

Best Spy Apps for SMS Tracking (Our Top 5 Picks)

September 22, 2022
How To Reset Windows 10 Start Menu (Complete Guide)

How To Reset Windows 10 Start Menu (Complete Guide)

July 27, 2022
  • About
  • Contact
  • Terms & Conditions
  • Privacy Policy
  • Affiliate Disclosure

No Result
View All Result
  • Tech Reviews
  • Guides and How To’s
  • Malware Removal
  • News
  • Software
  • Gaming