![BlendJet Blinking Red and Purple [EFFORTLESS FIXES!]](https://pigtou.com/wp-content/uploads/2023/08/BlendJet-Blinking-Red-and-Purple-EFFORTLESS-FIXES.jpg)
The BlendJet is famous for its ease of use and portability, but some users have reported that their BlendJets start blinking red and purple. This can be a frustrating problem, but it’s usually easy to fix since it mainly indicates improper alignment of the base and jar, a dead battery, an issue with your charging cable, or particles lodged between the blades.
In this article, we’ll discuss some solutions to fix the issues, especially if it keeps occurring even after charging the device for the required time or the blue light appears.
1. Replace the Battery
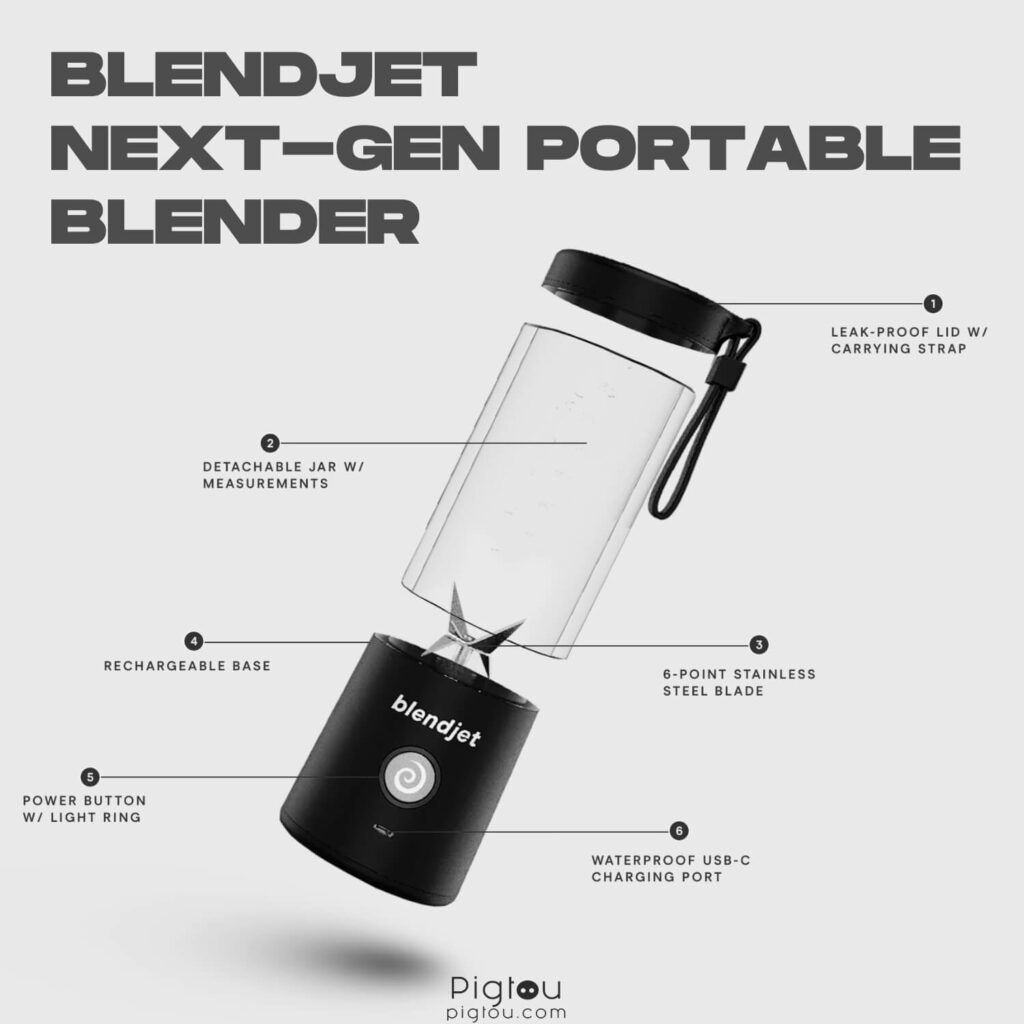
If you can’t get even a single cycle after charging your BlendJet blender, there could be an issue with the battery itself. The BlendJet uses a 2000mAh lithium-ion battery, so you might need a screwdriver and a soldering kit to change/repair the battery.
You can purchase a replacement battery from the BlendJet website or other retailers.
- Turn off the BlendJet and unplug it from the power source
- Remove the four screws on the bottom of the BlendJet base
- Carefully pry open the bottom of the BlendJet base
- Remove the old battery from the battery compartment (if the battery lead came undone, you can solder it back on)
- Insert the new battery into the battery compartment (ensure to orient it correctly)
- Close the bottom of the BlendJet base and screw it in place
- Charge the BlendJet blender for about 30 minutes
- Check if the red and purple blinking light issue is resolved
2. Reset the Blender
Resetting your BlendJet may fix any minor errors causing it to blink red and purple. Don’t hold the “Power” button for more than the recommended time when resetting, as this could damage the blender.
- Make sure the blender is powered off
- Press the “Power” button for 10 seconds
- Release the “Power” button immediately the lights flash red and purple (the blender has reset)
- Press the “Power” button once
- Charge the blender and confirm if the issue has been resolved
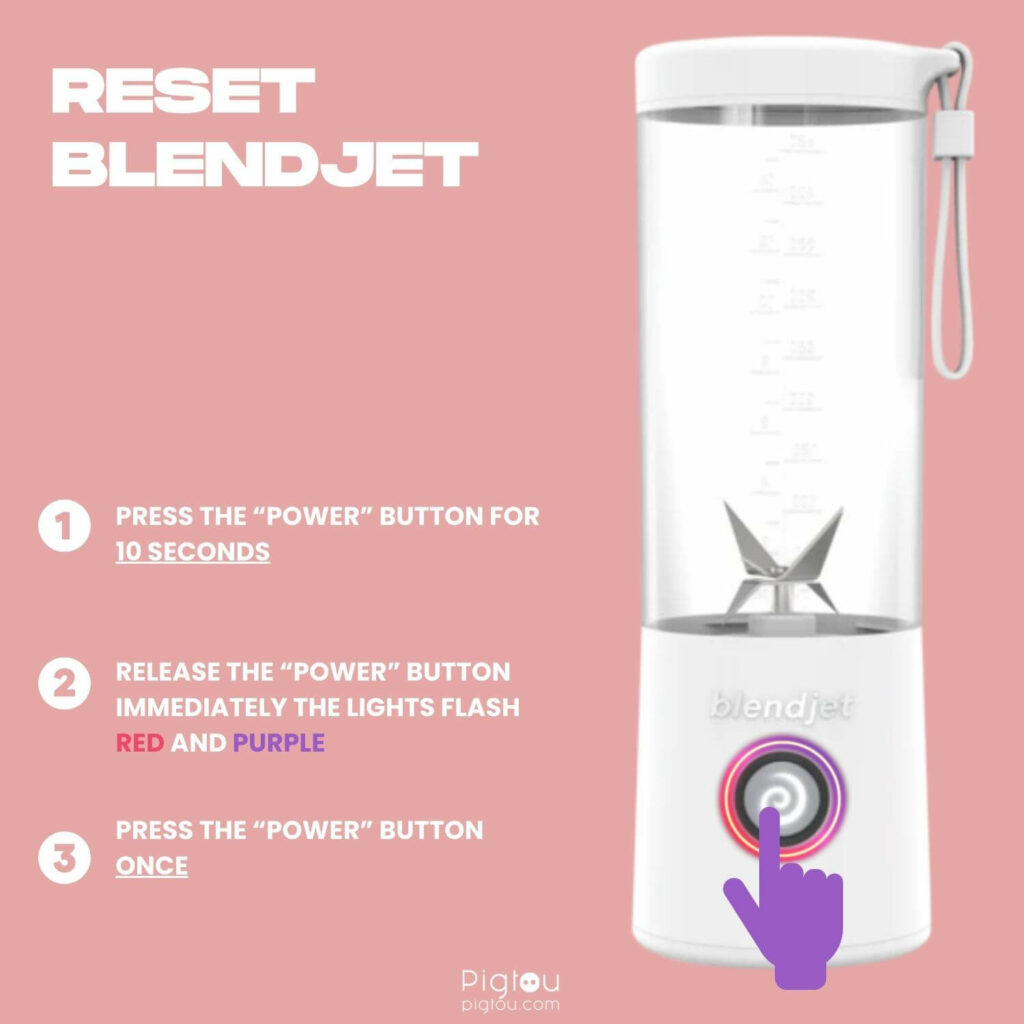
NOTE: Some users report that the steps above don’t work when resetting the blender. If this describes your case, hold the “Power” button until the light finishes blinking to reset the blender.
3. Check the USB Charger
BlendJet doesn’t use a power cable; instead, the device uses a high-quality USB-C cable for charging. Using incompatible/low-quality USB cables means the battery won’t charge properly.
- Unplug the USB, then firmly push the cable into the device to charge (don’t plug it in partially)
- Check the charging cable for any signs of fraying or damage; replace it if necessary
- Check whether the USB port is dirty or clogged; clean it using a toothpick or a cotton swab
- Try charging the BlendJet through a different USB port; if it’s still not charging, the charging cable might be faulty and needs to be replaced
NOTE: When charging the BlendJet blender, wait about one and a half hours for the device to charge fully. If you’ve changed the USB charger and this doesn’t fix the issue, contact support at 1-844-588-1555 or support@blendjet.com because the USB receiver could be defective.
4. Connect the Base Correctly
Sometimes, users incorrectly connect the base that houses the battery to the blending jar. As a safety precaution, BlendJet won’t work unless the magnets (marked by arrows) in the jar and base of the blender align.
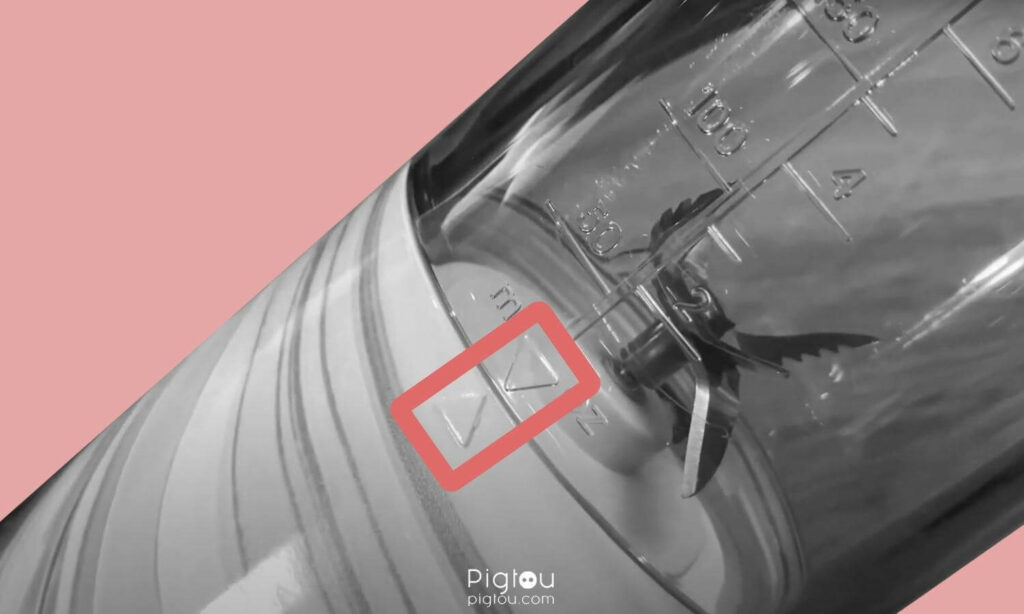
- Loosen the jar from the base
- Screw it back in until the arrows on the back of the jar and base align, but don’t worry if it’s not perfect (however, avoid over-tightening the base as this may damage the blender)
- Check the “Power” button on the front—a flashing white (instead of red) light indicates proper alignment
- You can start blending without any issues
NOTE: If the red blinking light is persistent, check the lower edge of the jar for a small black magnet, which signals the bottom part of the blender to start working. If your BlendJet doesn’t have this magnet, it cannot work correctly, so contact support for a repair or replacement.
5. Check for Leaks
Leaks mainly occur when the BlendJet jar and base aren’t connected properly, meaning fluid flows from the jar to the base, affecting the device’s battery life. The device could also leak battery fluid; hence, it can’t hold a charge.
5.1 Check the Jar and Base for Leaks
Leakage from the jar or base can interfere with the proper functioning of the blender.
- Inspect the jar and base for any cracks or damage
- Make sure that the jar and base are correctly aligned (the rubber pieces should be pushed down as well)
- Screw the jar and base together tightly
- Verify that there’s no fluid leakage
5.2 Check the Battery for Leaks
If you’ve checked the jar and base, and they’re not leaking, the leak might come from the battery.
- Check for any leaks from the battery compartment (you’ll see battery fluid on the outside of the compartment)
- If there are signs of a leak, replace the battery and clean the battery compartment:
- Turn off the BlendJet and ensure it’s not plugged into a power source
- Remove the four screws on the bottom of the BlendJet base
- Carefully pry open the bottom of the BlendJet base
- Remove the old battery and insert the new battery into the compartment
- Close the bottom of the BlendJet base and screw it in place
6. Clean the Jar and Blades
The BlendJet blender requires a lot of power to function, and considering its battery can hold a limited amount of charge, using faulty or dirty blades/jars makes the blender less efficient and consumes more power.
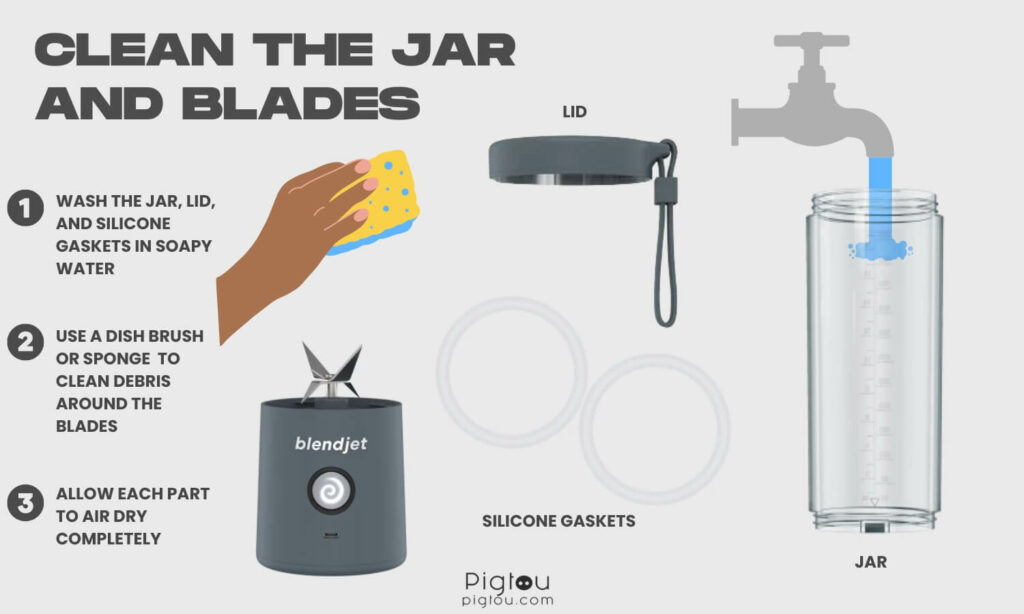
- Remove the jar from the base by twisting it counter-clockwise while twisting the base in the opposite direction
- Carefully use a fork to remove silicone gaskets from the lid and base (note that the grooved gasket belongs in the base)
- Wash the jar, lid, and gaskets in soapy water
- Use a dish brush to clean debris around the blades (avoid hand contact)
- Allow each part to air dry completely (using a hairdryer or other heat sources could warp the blades)
- Reassemble the BlendJet by placing the grooved gasket in the base (grooved side down)
- Use the tip of a spoon, if needed, to firmly press the gasket into place to prevent leakage
- Place the jar on top and screw it into the base to fully secure the gasket
- For the lid, position the second gasket and push it into place using your fingers or a spoon
- Check if the issue is resolved
7. Check for Anything Lodged Between the Blades
If your BlendJet dies after blending for a few seconds, it could be that you’re blending a very thick mixture or there’s a particle stuck between the blades.
- Turn the blender sideways (if it continues to blend, then the consistency of what you’re blending could be too thick, or there’s something stuck)
- Shake the blender a few times and turn it upside down to unclog it
- Remove the top of the blender and use a fork to dislodge any particles causing the blades not to turn
- Ensure you’ve put the correct amount inside the jar (putting too much could cause the blender not to work)