![Hisense Roku TV Keeps Restarting [FIXED!]](https://pigtou.com/wp-content/uploads/2023/08/Hisense-Roku-TV-Keeps-Restarting-FIXED-1.jpg)
Does your Hisense Roku TV keep powering on and off? If you want to play games or stream movies, this could be a nightmare.
A TV that keeps restarting could be due to the TV settings, firmware or software glitches, incoming signal issues, or electronic interference from other devices (such as speakers, rotating fans, cordless phones, and cell phones) that are too close to the TV.
Follow the steps below to end the screen flashing on and off:
1. Use the Reset Button on Your Roku TV
You might need a screwdriver set and a paper clip for this fix. You’ll also have to enter all your credentials again.
- Plug in the TV and turn it on
- Pull the power cord and hold the power button (on the TV) for about 30 seconds
- Find the reset button (hole) on the side or back of the TV, usually labeled “Reset”
- If it’s an older Hisense Roku TV, you might be required to take the back off and look on the main board for a microprocessor IC chip sticking up (use the screwdriver to remove the screws holding the back cover in place)
- Take a pin or a paper clip and stick it in the hole
- Hold the button in for about 15 to 20 seconds
- Try to turn on the TV and see whether the problem is resolved
- Repeat the process several times if it doesn’t work the first time
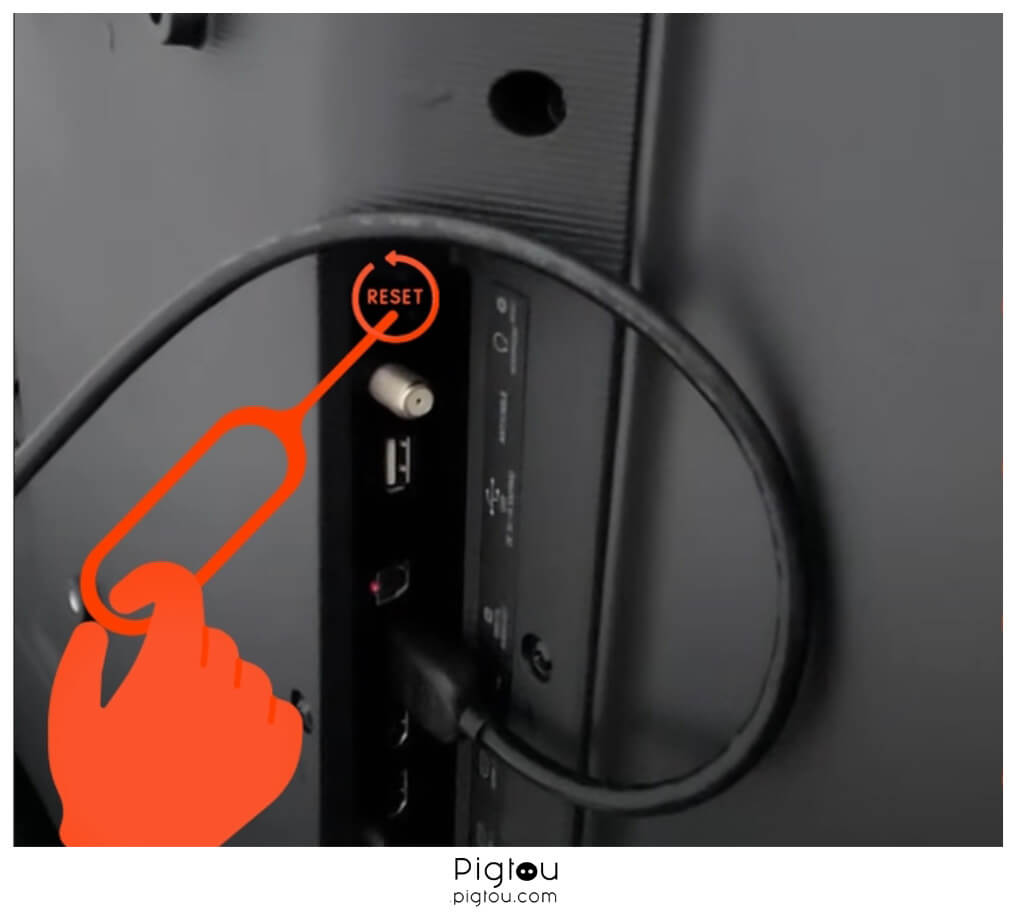
NOTE: If this doesn’t work after a few tries, repeat the same process, but plug the TV back in before holding the power reset button. Also, you can leave the TV unplugged for several days before pressing the reset button.
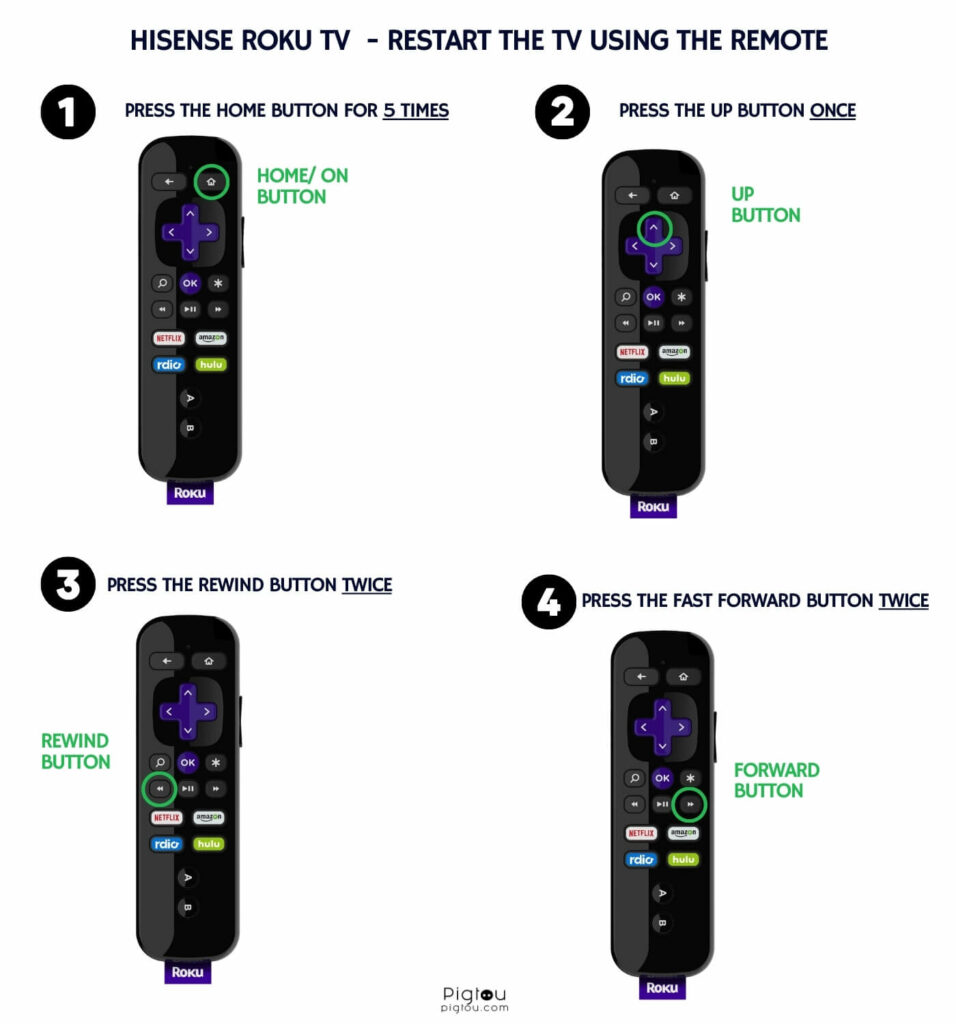
1.1 Use the Remote Sequence to Reset the TV
If you cannot locate the reset button on your Hisense Roku TV and it turns on for a few minutes before restarting, you can push a set of buttons on your remote in a sequence that will reset your TV.
- Press the “Home” button five times
- Press the “Up” button once
- Press the “Rewind” button two times
- Press the “Fast Forward” button two times
- Wait as the TV resets itself (the reset will start approximately two minutes after pressing the last button)
1.2 Hard Reset the Hisense Roku TV
This is an effective way of eliminating any technical problems that might be causing the TV to keep restarting.
- Disconnect your TV from the power
- Press the TV’s power button and hold it for about 10 seconds; then release it
- Plug the TV back in and check that the power cord is connected tightly to the TV
- Press the power button once and see whether the TV powers up normally
- If the TV keeps restarting, repeat the steps above again
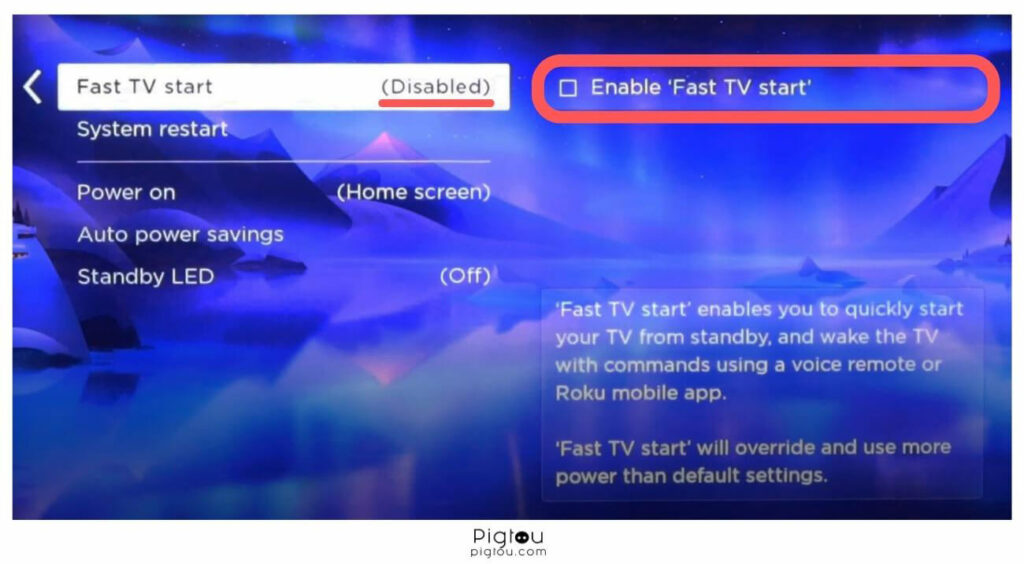
2. Turn Off the “Fast TV Start” Function
The “Fast TV start” feature quickly starts your Hisense Roku TV from standby and wakes it up with commands using the voice assistant or the Roku mobile app that enables you to cast music or video to your TV. However, it might cause your TV to reboot nonstop.
If your TV can start and stay on for a few minutes before rebooting, do the following to turn off the feature:
- Grab your remote and go to “Settings”
- Go to “System”
- Move to the right and select “Power on”
- Scroll down and select “Fast TV start”
- Toggle it to “Disable”
3. Set Up the TV for “Store Use”
If your Hisense Roku TV keeps restarting when in “Recovery Mode” despite the update, take the following steps to set the TV up for “Store use,” not “Home use”:
- Turn on your TV and wait for the “Recovery mode” screen to appear
- Press the “Reset” button for only two minutes
- As the TV’s software reboots, interrupt it quickly by pressing and holding the “Reset” button for about 15 seconds (the screen will go blank for a while and bring up the normal setup screen for your TV)
- Set up the TV for “Store use” (go to Settings > Device preferences > Usage mode > Store mode)
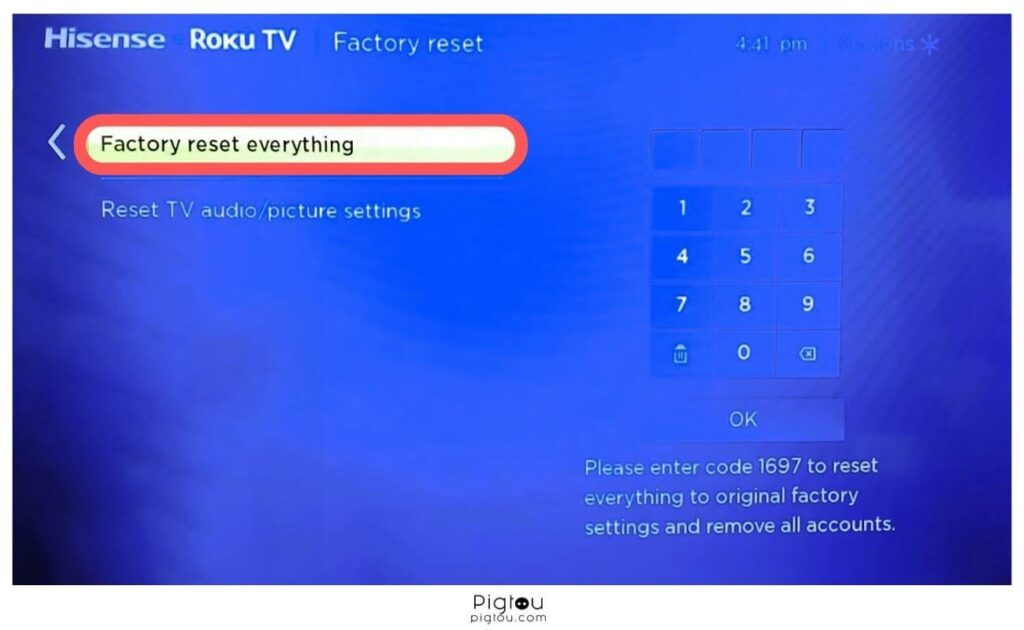
- After it’s stable, connect to your Wi-Fi network and do a software update (see below) and a factory reset (Go to Settings > System > Advanced system settings > Factory reset > Factory reset everything)
- When the TV reboots after the factory reset, try setting it up again for “Home use” (go to Settings > Device preferences > Usage mode > Home mode)
4. Perform a Picture Test
If the TV stays on for a few minutes before restarting, perform a picture test to determine if there are any flaws or faults:
- Grab your remote and press the “Quick” menu
- Scroll and select “Settings”
- Scroll and press “Support”
- Select “Self Diagnosis” and press “OK”
- Choose “Picture Test”
- Select “No” and press “OK”
- Wait as the picture test completes
- Check whether the TV is functioning properly
5. Turn Off Energy Saving
When this feature is activated, it enables your Roku TV to enter a low-power mode after sitting idle for a while. This feature might cause issues when you want to power up your TV again, so turn it off by following these steps:
- Tap on the “Home” button on your remote
- Scroll down and select “Settings”
- Tap to the right and scroll down to “System”
- Go to the right and scroll down to “Power”
- Tap to the right and select “Auto power savings”
- Select the option “Turn off”
6. Check Connected Devices for Grounding Issues
The flickering may be caused by bad ground in an external device (DVD player, VCR, Game System, etc.) connected to the TV.
To check for grounding issues:
- Unplug all other devices plugged into the same plug/circuit as the TV
- Try playing back video from an internal source, such as an app or connected USB
- See whether the TV will stop restarting
6.1 Disconnect and Reconnect All External Devices
If your Hisense Roku TV keeps restarting only after you plug in external devices, like a gaming console, get a replacement HDMI cable and try the following fix:
- Disconnect all the external cables and devices from the TV, including HDMI cables, USB sticks, and Ethernet cables
- Unplug the TV power cable
- Unplug the gaming console
- Wait for about 30 minutes for all the static power to drain
- Turn on the TV and the gaming console before connecting them via HDMI
- Check your gaming console’s resolution and adjust it to (60 or 120 Fps) using these steps:
- Go to Home > Settings > Screen and Video > Video Output > Resolution (choose either Automatic, 2160p or 4K)
- Scroll down to “HDR” and select “On when supported”
- Scroll down and select “Adjust HDR” (click on “Next” three times to calibrate the screen)
- Scroll down to “RBG Range” and set it to “Automatic”
- Scroll down again and toggle on “120 Hz Output”
- Back out of the screen and go to “Saved Data and Game/App Settings”
- Go down to “Game Presets”
- Move over to the right to “Performance Mode or Resolution Mode” and select “Resolution Mode”
- Check whether the constant boot loop has stopped
NOTE: If the steps above don’t work, your HDMI cables could be faulty, so use replacement cables to make the connections.
6.2 Check Whether Other Devices Are Triggering the Loop
Other devices, like a garage door opener or a satellite flying over your home daily, could be in the same frequency as your TV, thus triggering it to restart. You might need replacement AAA batteries.
- Try moving your TV to another wall or room
- Replace the remote in your batteries, and if this doesn’t work, remove the batteries from the remote
- Check whether the issue is resolved
- If the above steps don’t work, contact Hisense at 1-888-935-8880 to get their opinion on what might be causing the interference
7. Update the TV’s Firmware
You might need a firmware update if your TV keeps restarting on the logo screen. Contact the manufacturer for a firmware update on a USB, but don’t get the firmware from any other online place. You might need a 4GB flash drive.
- After contacting the manufacturer, wait for the USB to be delivered to your address and plug it into the TV
- If you’d rather download the update yourself, first format the disk:
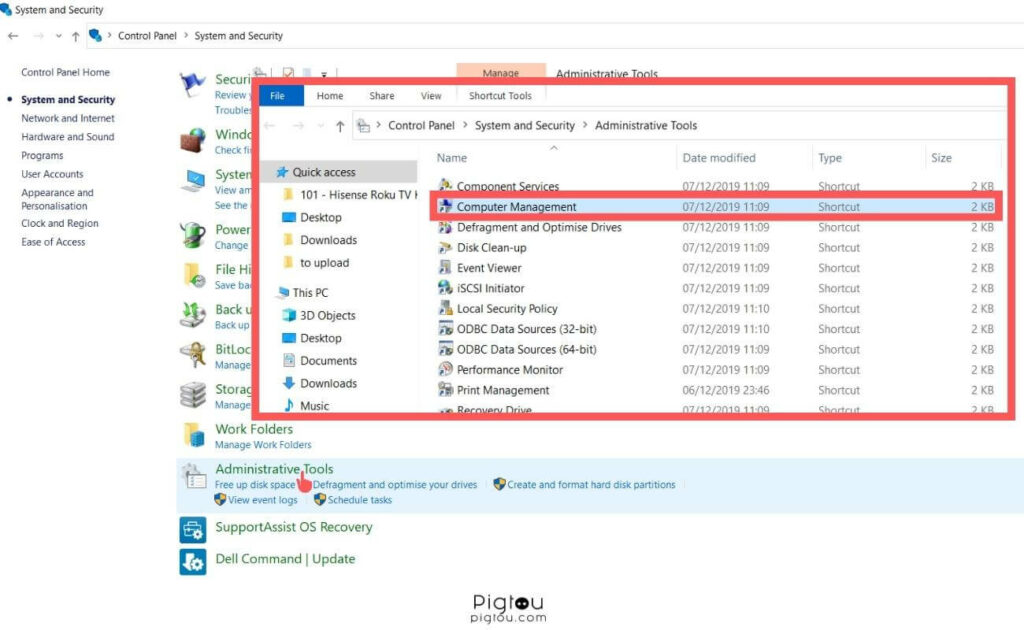
- When formatting using a PC, plug the flash drive into the computer and go to Control Panel > Administrative tools > Computer Management > Disk Management > Format > select FAT32 (select FAT16 if the flash drive is less than 2GB)
- When using a MAC, go to Finder > search for “Disk Utility” > choose the flash drive (on the left panel) > click “Erase” (on the right panel) > select “MS-DOS (FAT)” > Click “Erase” twice
- Grab your computer and open a web browser
- Type “tvupdate.roku.com” on the URL bar
- Choose Hisense Roku TV and enter your TV’s model and serial numbers (use your remote to go to Settings > System > About to find this information)
- Click on “Download Software” and wait as the installer file [update.roku] downloads to your computer
- Copy the installer file to your USB drive (make sure that it’s the only file in the flash drive and it’s not in a subfolder)
- Plug in the USB flash drive into your Hisense Roku TV
- Grab your TV remote and go to Home > Settings > System > System update > I can’t connect
- Wait as your Hisense Roku TV validates the files
- Enter the 12-digit code that will be displayed on the TV screen on your computer
- Another 6-digit code will appear on the computer’s screen; enter it into your Hisense Roku TV using your remote
- After the software update completes, the TV restarts once; remove the USB flash drive
NOTE: If you get an error message saying, “Content of the update file is invalid,” it means that your TV’s software is up-to-date.
7.1 Check and Reset Your Network Settings
Sometimes, a boot loop occurs after a firmware update, changing the MAC address to all zeros (00:00:00:00:00:00). You might need Ethernet connectors before proceeding with these steps:
- Reset your network (go to Settings > System > Advanced system settings > Network connection reset)
- Try connecting to Wi-Fi, and if it fails, don’t reboot the TV; instead, use Ethernet connectivity (Ethernet connectors achieve high-speed data transfer)
- Wait for 24 hours and then try downgrading the software (follow the steps above to downgrade via USB)
7.2 Reboot Your Router and Roku TV
If your TV gets stuck on a software update loop, a reboot can clear any minor glitches affecting your router and Hisense Roku TV.
- Unplug the router from the power source
- Turn off your TV using the remote or power button
- Wait for about two minutes
- Plug the router back into the power source and wait for all lights to turn green
- Plug back the TV and turn it on
- Try connecting to your home Wi-Fi network to complete the update
- Use Ethernet if the Wi-Fi connection fails
8. Check and Replace Faulty LED Strips
Check whether you have blown LED lights that might be causing your Hisense Roku TV to restart. You’ll need replacement LED strips, a screwdriver set, duct tape, and a pry plastic tool for this fix.
- Switch off the lights in the room so that it’s completely dark
- Turn on the TV
- Take a flashlight, turn it on, and run it through the screen to see if there is any movement
- If you see any movement, then the backlight could be faulty; replace it
- Turn off the TV and remove the back cover
- Disconnect the ribbon cable to the panels and T-CON board
- Remove the bezel screws on all four sides of the TV
- Disconnect the IR sensor and remove the bezel on all four sides
- Gently lift the scan drive boards, fold them up, and carefully tape them to the TV panel
- Run a pry plastic tool along the panel to separate it from the chassis, as it might be glued together
- Carefully lift the panel from the chassis and set it down on a clean, flat surface
- Remove the screws and brackets for the light filter frame
- Carefully lift and remove the filters
- Remove the clips that hold the reflectors in place to the chassis
- Remove the reflector sheet and the film that’s over the strips
- Disconnect the LED strips and remove them from the chassis
- The LED strips are held in place by clips; slide them out
- Install the replacement strips and connect them to the power cable
- Reinstall the reflector sheet and clips
- Reinstall the light filters and filter frame on all four sides
- Reinstall the panel and realign the scan drive boards
- Reinstall the TV bezel and screws
- Reconnect the ribbon cables to the panel and T-CON board
- Reinstall the back cover
- Plug your TV into a power source and turn it on to see if the problem is fixed
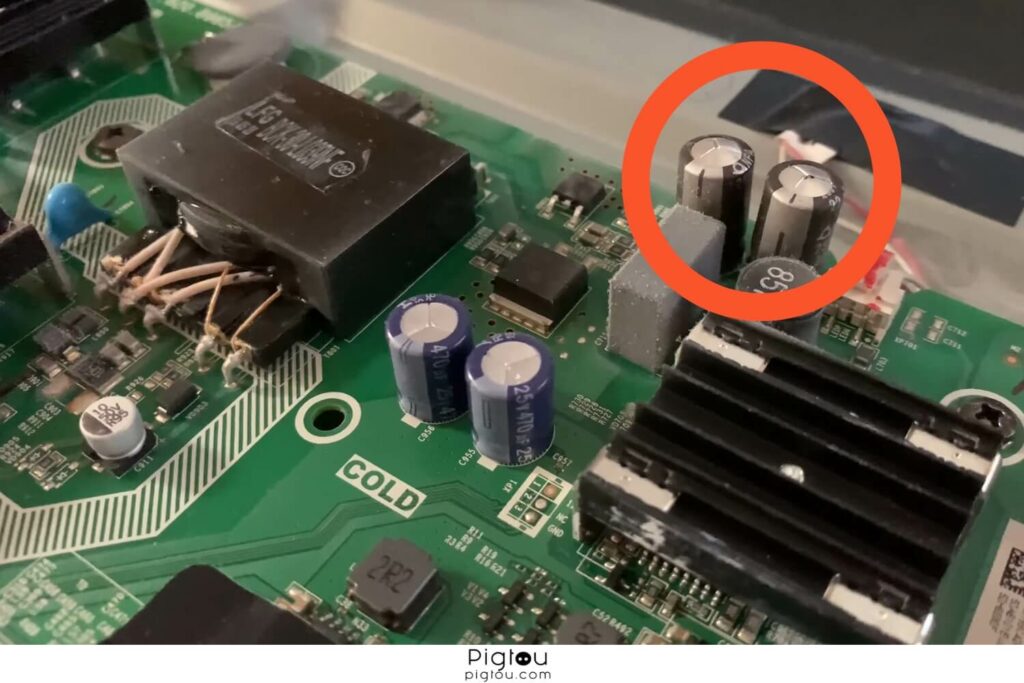
9. Replace Blown Capacitors
Sometimes, blown capacitors might cause a glitch in the TV, causing it to keep restarting. For this step, you’ll need replacement capacitors, a screwdriver set, a desoldering gun, a soldering iron toolkit, and a 20k ohm resistor.
- Unplug your TV from the power source and let it sit for about 30 minutes to eliminate the risk of an electric shock
- Remove the back cover of the TV and check for blown capacitors (they should appear popped up at the top)
- Unscrew the circuit board and use a 20k ohm resistor across the capacitor terminals to discharge them
- Use a desoldering gun to melt the old solder and remove the blown capacitors
- Solder the new capacitors in place; make sure you have the rights value capacitors, and you install them correctly (check where the positive and negative terminals should be)
- Reattach the TV’s back cover
- Plug the TV back in, turn it on, and check whether the issue is resolved
10. Replace the Wi-Fi Module
If fixing the LED strips and blown capacitors doesn’t solve the problem, consider replacing the Wi-Fi board. You’ll need a screwdriver set and a pry plastic tool for this fix.
- Turn off your TV, unplug it from the power source, and remove the back panel
- Use the pry tool to carefully compress the plastic tab (on both sides) that’s holding the Wi-Fi module in place; simultaneously pull up the Wi-Fi module out of the slot
- Carefully disconnect the wires (raise the plastic tab above its locking slot and shift the connection point outward)
- Grab the new Wi-Fi module and carefully compress it until it snaps into place
- Carefully insert the electrical connection (line it properly and push it until it clicks)
- Gently realign and rest the back panel in place
- Check that all the screw holes are visible before you start inserting screws
- Insert and secure all the screws
- Plug your TV in, turn it on, and check whether it works without restarting
11. Replace the Mainboard
We recommend taking pictures during the repair process as a reference point. You’ll need a replacement mainboard and a screwdriver set for this fix.
- Turn off the TV and unplug it from the power source
- Remove the back panel of the TV
- Locate the mainboard and disconnect all the cables on it
- Remove all the screws that hold the board to the TV panel
- Slide the replacement board into position and tighten it to the panel with the screws
- Reconnect all the cables on the board
- Reattach the back panel of the TV
- Plug the TV into the power and turn it on
NOTE: If the above fixes don’t work for you, call Hisense at 1-888-935-8880 (Monday to Friday from 9 am to 9 pm EST and Saturday and Sunday from 9 am to 6 pm) or email them at service@hisense-usa.com for help.