![Lenovo Laptop Not Charging, No Light [ACTIONABLE FIXES!]](https://pigtou.com/wp-content/uploads/2023/08/Lenovo-Laptop-Not-Charging-No-Light-ACTIONABLE-FIXES.jpg)
You can understand the aggravation if your Lenovo laptop has experienced recurring charging issues. It obstructs your productivity, limits mobility, and makes you concerned about data loss because of unforeseen shutdowns. The laptop’s hardware starts to nag at your thoughts and the idea of potential maintenance costs and a heavy reliance on charging equipment adds another layer of unease.
Causes of this scenario include software or hardware issues, network connection problems, and outdated or corrupted drivers. Fortunately, you can solve this issue with these troubleshooting steps:
1. Restart, Power Reset, or Remove Battery
A Lenovo laptop that won’t charge, recognize the charger, or lacks a charging indication light may be fixed by restarting, power resetting, or removing the battery. Each of these fixes focuses on various parts of the laptop’s functionality and can assist in multiple ways.
1.1 Restart the Laptop
This could resolve software-related issues; it refreshes the operating system and its processes, which is useful when minor faults or conflicts threaten to interrupt the charging behavior of the laptop.
Save ongoing work and close applications, and then follow these steps:
- Access the “Start” menu in the screen’s lower-left corner
- Find the “Power” icon at the bottom-right corner of the screen
- Navigate to the “Power options” menu and choose “Restart”
Alternatively, you can use keyboard shortcuts:
- Hold down the “Ctrl” key
- While still holding “Ctrl,” press “Alt” and “Delete” simultaneously
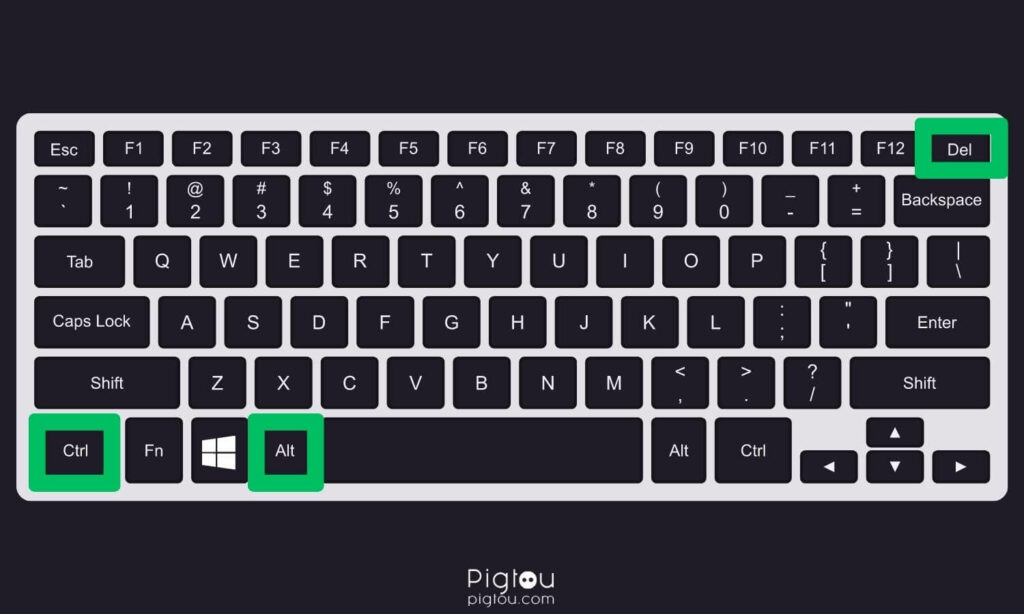
- Click on the “Power” icon at the bottom-right corner of the screen
- Open the “Power options” menu and click on “Restart”
Following this, your Lenovo laptop will initiate the restart procedure, which may take a few minutes. Once restarted, the operating system and previous applications will reload.
1.2 Power Cycle (Hard Reset) the Laptop
This removes residual electrical charge from laptop hardware, addressing various problems, such as unresponsiveness, power anomalies, and complex charging issues.
- Disconnect all external devices (such as a printer or a USB drive) and power off the laptop
- Disconnect the power cable from both the socket and the laptop
- Remove the battery from your gadget
- Press and hold the laptop’s “Power” button for about 30 seconds
- Reinsert the battery and connect the charger to the laptop
- Turn on the laptop and check if it’s charging
1.3 Use the Reset Hole
The reset hole is a small pinhole or button (typically on the bottom or sides) on Lenovo laptops that can perform a hard reset or restart when the computer is unresponsive or not charging. This action is useful if the laptop’s normal power button is malfunctioning or the system is frozen.
- Use the “Power” button to turn off the laptop
- Get a thin paper clip
- Press and hold the “Reset” hole for 10 seconds with a paper clip
- Power on the laptop and try to charge it again
NOTE: The specific location and design of the reset hole might vary based on your laptop model; go to Lenovo official website > enter your laptop’s serial number in the search bar > select “Knowledgebase and Guides” > get the user manual to find where the reset button is located on your device.
1.4 Remove the Battery
Removing the battery from a laptop achieves a power reset by disconnecting the power source and eliminating static charges or minor hardware issues. This fix addresses charging and power problems.
- Disconnect power supply and remove the battery (release it gently by unfastening the bottom latches)
- Press and hold the “Power” button for about 60 seconds
- Connect the charger to your laptop
- Turn on the device using the “Power” button
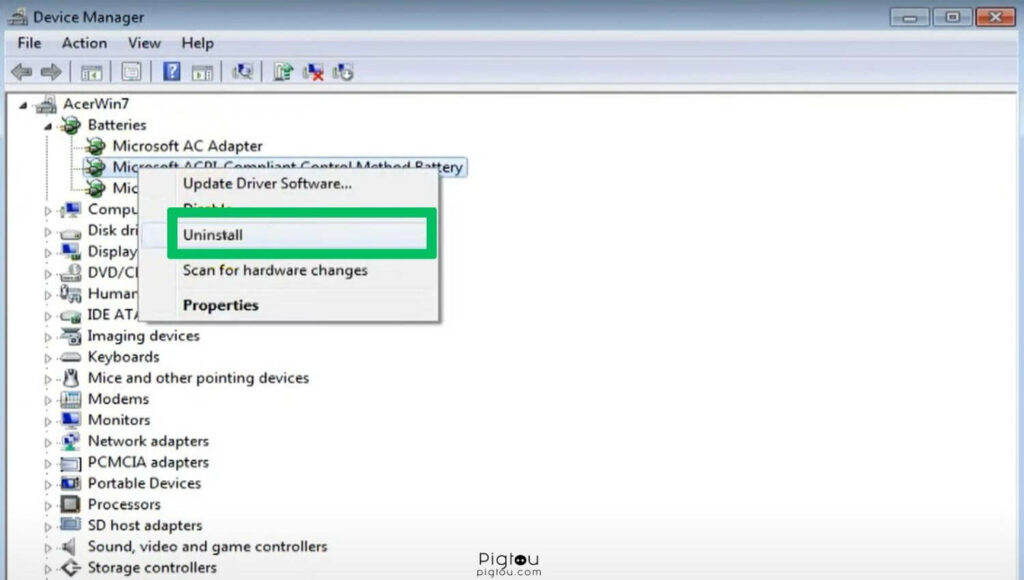
- Go to Control Panel > Device Manager > Batteries
- Right-click all “Microsoft ACPI Compliant Control Method Battery” options and then “Uninstall”
- Power off the laptop and disconnect the power supply
- Insert the battery and connect the power supply
- Power the laptop on
2. Check the Adapter and Cable
Ensure your charging components are in good condition and properly connected. You might need a multimeter, a replacement adapter, and a USB-C charging cable.
- Examine your charger and power adapter for any damage
- If a backup charger is available, try it out
- Use the multimeter to test voltage at different power outlets
- Ensure secure connections at all points
- Test the charger on another device and vice versa
- Check the charger’s voltage
- Swap out the charging cable, if necessary
- Test the laptop without the battery
- Some Lenovo laptops can be charged using a USB Type-C cable or power bank; check if doing so charges your device
3. Clean the Charging Port, Connectors, Battery Compartment
Once you’ve eliminated the possibility of your charging cable or adapter being the source of the issue, remove any accumulated debris, dust, or lint from the charging port. You might need a can of compressed air and a microfiber cloth.
- Turn off your Lenovo laptop
- Unplug the charger and remove the battery (if necessary)
- Gather soft tools, such as a toothpick or soft brush
- Inspect the charging port for debris
- Hold the laptop upside down to remove loose particles
- Gently use a toothpick or brush to clear visible debris
- Use short bursts of compressed air on the charging port and connectors (avoid using liquids or direct compressed air)
- Use a microfiber cloth to wipe around the battery compartment
- Recheck to ensure debris is removed
- Power on your Lenovo laptop when satisfied
NOTE: Exercise utmost caution and gentleness throughout the cleaning procedure to prevent any harm to your Lenovo laptop’s charging port and internal components.
4. Update or Reinstall Battery Drivers
Since your battery functions as an external component, Windows relies on specific drivers to ensure proper interaction. If your laptop remains connected to a power source without charging even after attempting the earlier steps, consider updating or uninstalling these drivers.
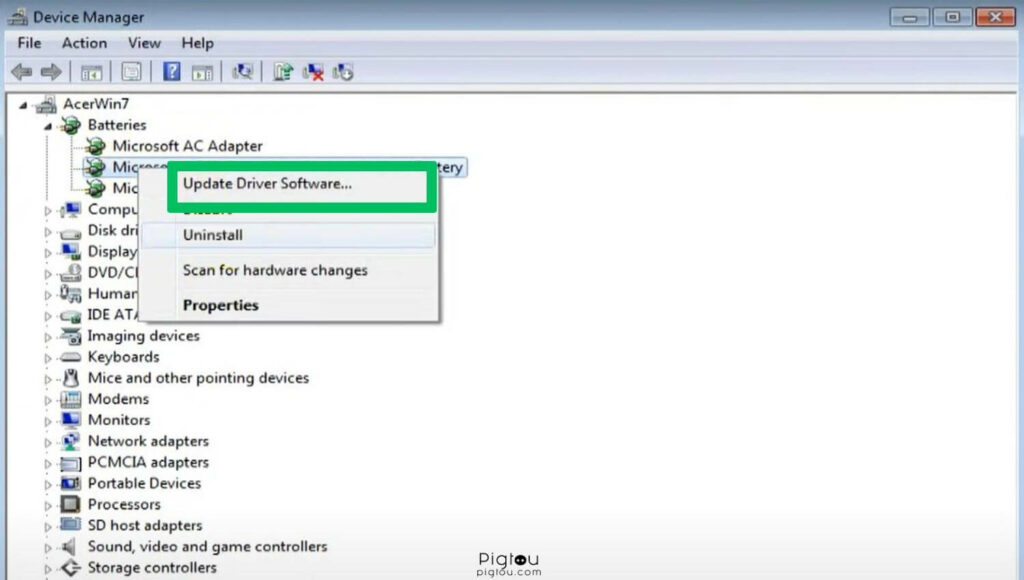
- Right-click the “Start” button or use “Win + X”
- Select “Device Manager”
- Expand the “Batteries” section
- Look for “Microsoft AC Adapter” and “Microsoft ACPI-Compliant Control Method Battery”
- Right-click each entry and select “Update driver” (though you might not find any updates, it’s worth a try)
- If updating doesn’t resolve the issue, right-click each battery entry
- Choose the “Uninstall device” option (this temporarily stops battery interaction but will reinstall on reboot)
- Restart your laptop after uninstalling each battery device
After rebooting, let Windows automatically reinstall the battery driver, and it might restore charging functionality. If not:
- Repeat the process, but this time, shut down the device after uninstalling the drivers
- Before restarting, unplug your charger and remove the battery
- Reassemble and turn on your laptop
5. Update the Basic Input Output System (BIOS)
The BIOS is preloaded on the motherboard and is in charge of booting up your system. Incorrect BIOS setups may contribute to the “plugged-in not charging” issues. Here are some of the common methods to update your Lenovo BIOS:
5.1 Update BIOS Through an Executable File
Executable files provide a quick and simple method to update the BIOS directly from your computer’s operating system.
- Go to support.lenovo.com
- Enter product details in the search bar
- Choose your device from the dropdown
- Go to the “Drivers & Software” tab
- Navigate to the “Operating System” dropdown and click on “OS”
- Click on the “Component” dropdown and choose the “BIOS/UEFI” option
- Download the latest BIOS update
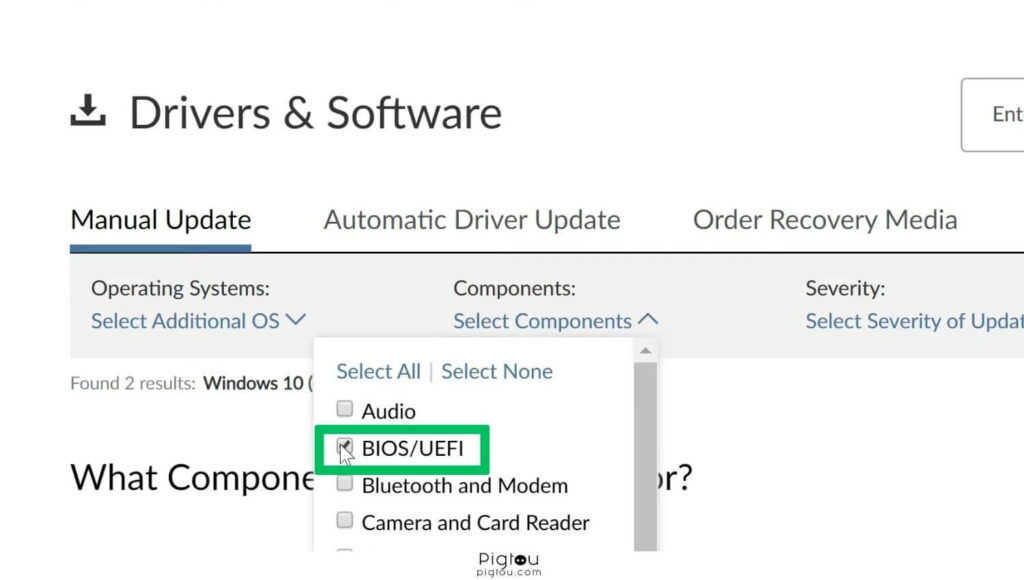
- Double-click the downloaded file
- Follow the prompts for installation
- You can proceed to delete the downloaded file after a successful update
5.2 Update BIOS and Drivers With Lenovo Vantage
Updating via Lenovo Vantage provides streamlined, efficient benefits. Automated scans guarantee compatibility; official updates offer reliability and safety with expert assistance.
Click on the “Lenovo Vantage” icon in your computer’s application menu or taskbar to launch the app, then:
- If on full screen, find “System Update” under the top device option; if not, toggle the “Menu” or use the “Quick Settings Update” button
- Select “Check for Updates” to commence the scan
- See the available updates after scanning
- Scroll down to “BIOS Update” and mark the checkbox
- Click “Install Selected Updates”
- A reboot is required for the BIOS update; press “OK” for the reboot prompt to start downloading
- Navigate to the “Flash Update Utility” and select “Update BIOS”
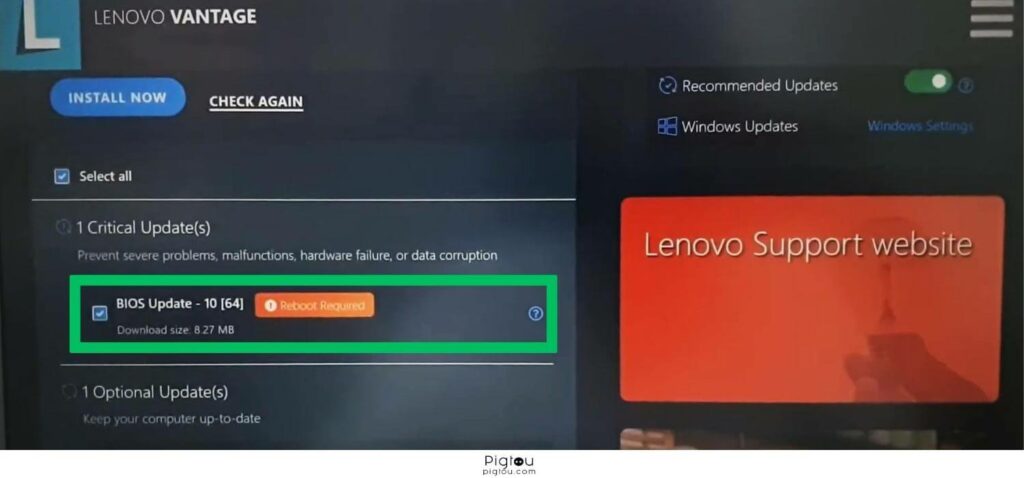
- Once finished, you’ll receive a prompt to reboot the computer; restart the computer and see if it’s now charging
6. Check/replace MOSFETS
When you have burned out MOSFETS, the power supply won’t function optimally, hence causing your laptop not to charge. For this step, you’ll need advanced technical skills and some supplies, including a multimeter, soldering kit, screwdriver set, and replacement MOSFETS (verify part numbers before buying).
- Use a screwdriver to open the back panel of your laptop
- Check the voltage of these pair of MOSFETS using a multimeter
- If the readings of the two are anywhere between 19VDC to 25VDC, they’re ok; if the readings are off, replace the MOSFETS; contact Lenovo support for details about your warranty (if valid) or find a professional repair service on Craigslist.