![Nintendo Switch Won't Turn On or Charge [SOLVED!]](https://pigtou.com/wp-content/uploads/2023/09/Nintendo-Switch-Wont-Turn-On-or-Charge-SOLVED.jpg)
Since its release in 2017, the Nintendo Switch continues to impress gamers worldwide with its good library, amazing graphics, and portability. However, this great gaming experience can easily be halted if this hybrid video game console becomes unresponsive.
Your Nintendo Switch won’t turn on or charge properly due to a dead battery, software issues, a faulty AC adapter, frayed cable, console damage, controller malfunction, faulty/clogged charging port, faulty motherboard, overheating issues, or other hardware failure. Luckily, here are some user-recommended troubleshooting tips to help you resolve the issue and return to the game.
1) Let Your Nintendo Switch Charge
Usually, your console won’t turn on or charge because the battery is completely drained and hasn’t received any charge. Due to the pre-charge process required by most Lithium-Ion batteries, it may take a while before the console gets enough charge to turn on.
- Use the official Nintendo Switch power adapter to charge your console or place it in the dock
- Leave to charge for about an hour (in most cases, the Nintendo Switch will be fully charged in three hours)
- Press the “Power” button to power it on
- Check if this resolves the issue
NOTE: If your Nintendo Switch console’s battery is empty, a battery indicator may not appear on the screen once you plug in the charger. However, this doesn’t mean that your console is not charging.
1.1) Inspect the Charger
A faulty charger is a common cause of the problem when your Nintendo Switch won’t turn on at all or even charge. You’ll need a replacement charger if the one you’re using is faulty.
- Check if there are any bent pins on the charger
- Inspect the charging cable for any fraying or damage
- Make sure there are no cracks or buckling on the housing of the wall adapter
- If you see any signs of damage, don’t use the adapter as it could pose a danger; replace it with another official adapter (or you could try using every available charger you have first)
- If you’ve replaced the charger with a new one and it’s still not charging, leave the console for a few days (or a week) and then try charging again
- Try charging it directly on the cord, and if this doesn’t work, try charging on the dock
NOTE: When connecting the charger to the Nintendo Switch, first plug the charger into the console and then the wall socket, as doing it the other way around may prevent charging.
1.2) Check the Battery
If the battery of the Nintendo Switch is dead, it cannot power on. If you’re handy, get a screwdriver set and a multimeter and access the inside of the console. You might need a replacement battery, too.
- Use a screwdriver to remove the screws holding the console’s cover in place
- Locate the battery and disconnect it from the motherboard
- Press the “Power” button for 10-15 seconds to discharge the motherboard
- Use a multimeter to measure the battery’s voltage (if it’s below 2.4V, it won’t turn on, so get the new battery)
- Reconnect the battery and try powering on the console
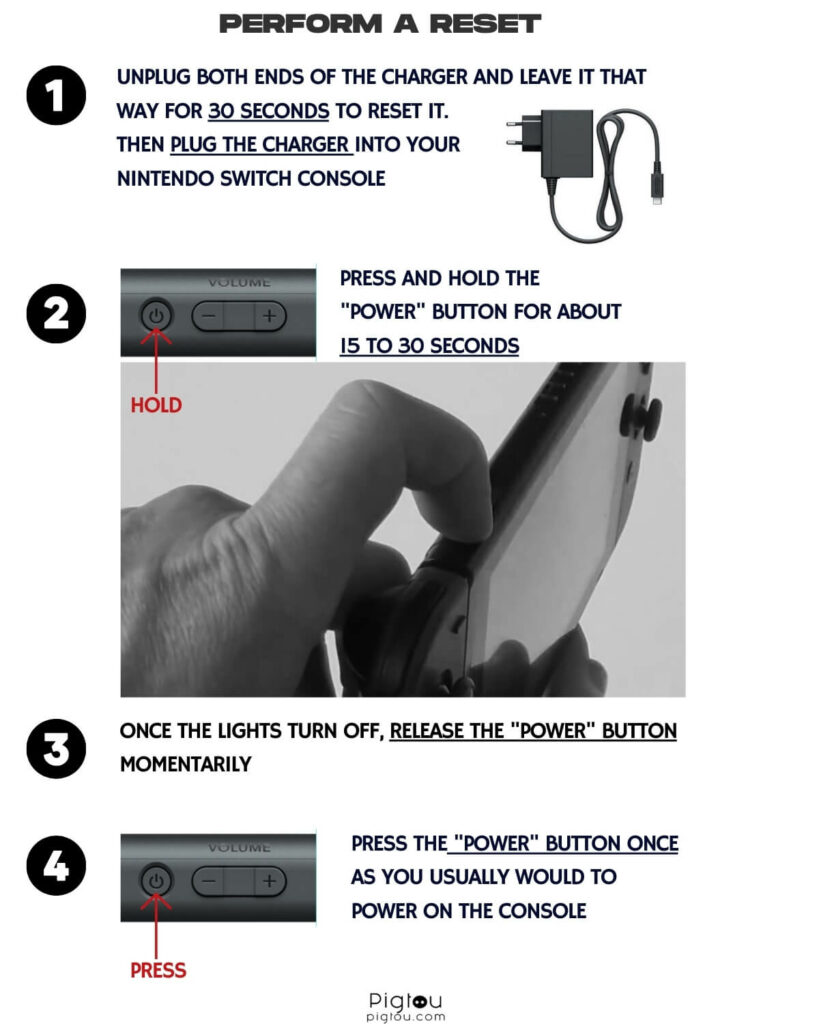
2) Perform a Reset
If the Nintendo Switch remains unresponsive even after charging it for a couple of hours, proceed to perform a soft reset. Doing this will not delete any data or settings but fix any software glitches.
- Unplug both ends of the charger and leave it that way for 30 seconds to reset it
- Plug the charger into your Nintendo Switch console
- Press and hold the “Power” button for about 15 to 30 seconds to shut down your console
- Once the lights turn off, release the “Power” button momentarily
- Press the “Power” button once as you usually would to power on the console
- Check whether it’s responsive and charging
- If this doesn’t work on the first try, repeat the steps, but this time, hold the “Power” button down for longer, say a minute, to power on the console
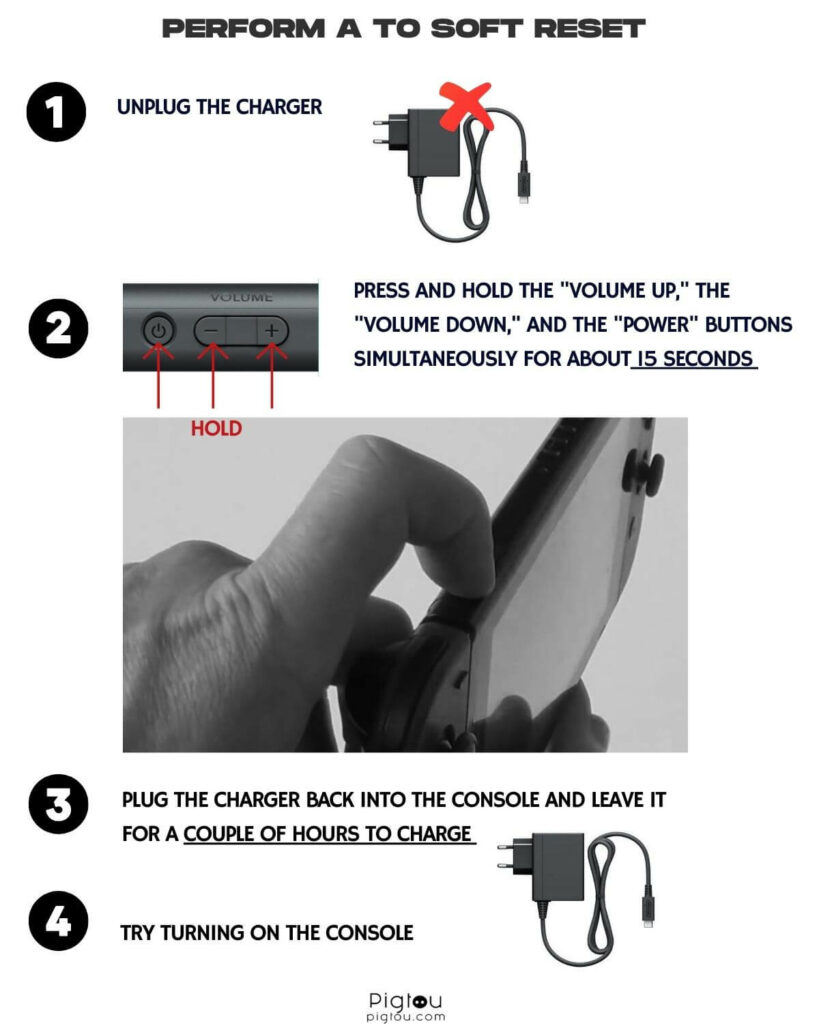
2.1) Reset via Different Button Combinations
If the first reset method didn’t fix the problem, try other different button combinations to soft reset your Nintendo Switch console.
- Unplug the charger
- Press and hold the “Volume up,” the “Volume down,” and the “Power” buttons simultaneously for about 15 seconds or;
- Press and hold the “Power” and the “Volume up” buttons at the same time for about 15 seconds or;
- Press and hold the “Power” and the “Volume down” buttons at the same time for about 15 seconds or;
- Press and hold the “Power” and the “Home” buttons simultaneously for about 15 seconds
- Plug the charger back into the console and leave it for a couple of hours to charge
- Try turning on the console
2.2) Reset Your Official Nintendo Switch AC Adapter
There are several electrical components inside your official Nintendo Switch power adapter. Any malfunctions make it impossible for the charger to power your console. Fortunately, power-cycling your AC adapter can help reset it and fix these issues.
- Unplug your AC adapter from your Nintendo Switch and the wall outlet
- Leave it for about 30-60 seconds (this will reset your AC adapter and set everything right)
- Plug it back into your Nintendo Switch, and then the wall outlet
- Check whether the charging indicator appears on the screen (if it does, leave your console to charge for about an hour before powering it on again)
3) Clean the Charging Port, Ribbon Cable
Your Nintendo Switch console’s charging port accumulates dirt and debris whenever you put it inside your pocket or bag. Over time, too much dirt will clog the port and cause your console to stop charging properly or working.
You’ll need a cotton swab, isopropyl alcohol, and a can of compressed air.
- Unplug the charger and dip a cotton swab inside a little bit of isopropyl alcohol
- Insert the saturated cotton swab inside your console’s charging port to scrub out dirt and debris
- Remove the ribbon cable (from the game card slot connected to the left side) and clean it using the cotton swab
- Repeat until the charging port and ribbon cable are visibly clean
- Dry out the charging port using a can of compressed air (or let your Nintendo Switch sit for a few minutes so that the charging port can dry out)
- Reconnect the ribbon cable
- Plug in your official Nintendo Switch charger and leave the console to charge for a few hours
NOTE: Don’t blow on the charging port with your mouth because your breath contains water particles that can add moisture to the port, causing even more damage to the device.
4) Check Your Wall Outlet
If your Nintendo Switch console is still not charging, that wall outlet might be the problem. Follow these steps to check whether your wall outlet is working properly:
- Unplug your official Nintendo Switch AC adapter from the wall outlet
- Plug another device into the outlet to see if it will start charging or turn on (if it doesn’t, it means something is wrong with your wall outlet)
- Plug your official Nintendo Switch AC adapter into another wall outlet
- Leave the console to charge for several minutes
- Try turning on your Nintendo Switch
5) Remove Joy-Con Controllers and MicroSD
If you’ve tried all the previous steps, but your Nintendo Switch console is still not charging or turning on, the Joy-Con controllers may also be drained.
- Press the buttons behind the Joy-Con controllers and slide them out
- Remove the microSD card and game card from the console
- Plug the charger back into your Nintendo Switch and leave it to charge for a few hours
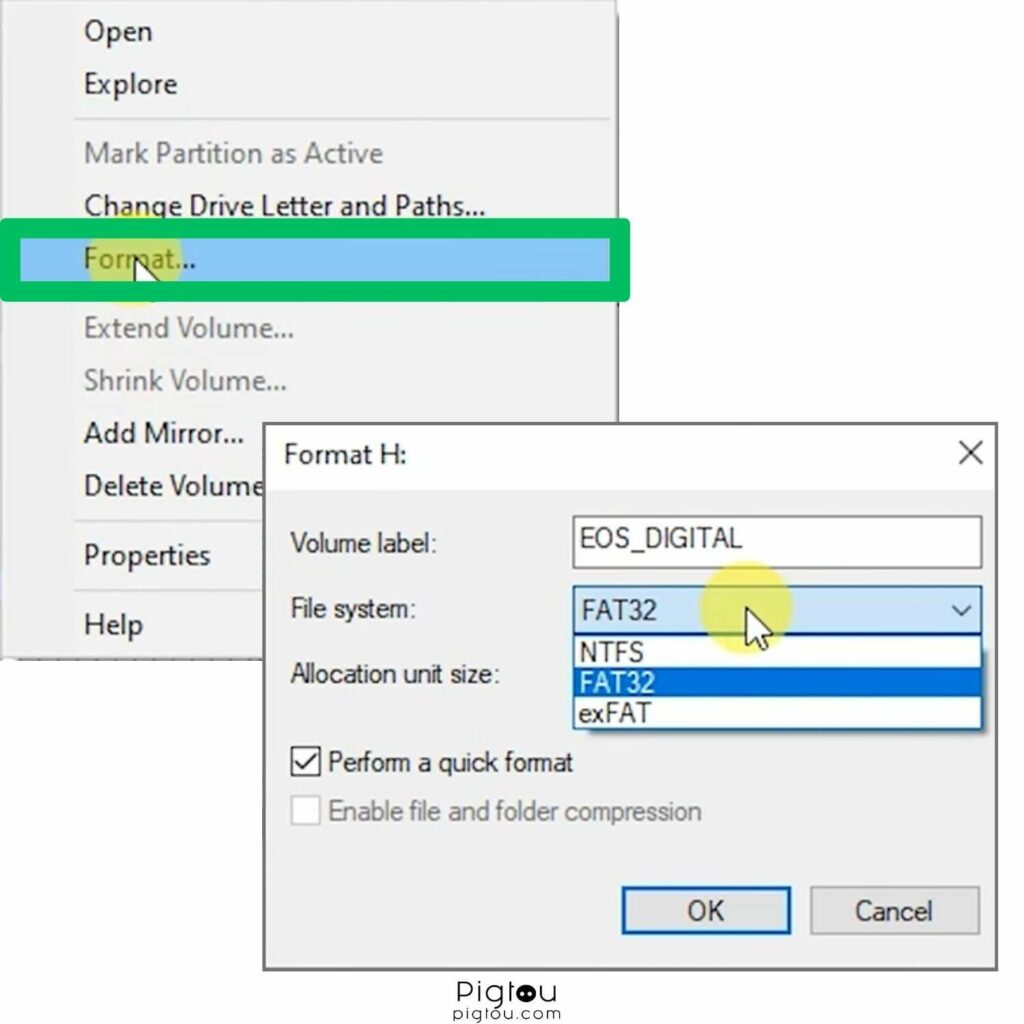
- Reformat the microSD card using either FAT32 or exFAT (connect the SD card to a computer > select “Partition Management“> select “Format” option > select FAT32 or exFAT)
- Set up the microSD card with the files you need (ensure they’re up-to-date)
- Reinsert the microSD card and the Joy-Con controllers to the Switch
- Power on your Nintendo Switch to check if this fixes the issue
6) Check the Power Button
Sometimes, the power button might have debris or is damaged, hence not making electrical contact when you press it. You might need cotton swabs and isopropyl alcohol to clean the power button.
- Test whether you can turn on the console from a controller (this indicates that the power button could be faulty)
- Check whether you can easily press the button; if not, the mechanism could be clogged by debris, so drip a few drops of isopropyl alcohol on the button and clean it with cotton swabs
- If all the above steps still don’t yield fruit, replace the power button cable or the motherboard (confirm serial number before ordering replacements)
7) Replace the Motherboard
If you’re handy, you could replace the M92 and P13 chips or blown capacitors; otherwise, it would be best to replace the entire motherboard if the steps above haven’t solved the issue.
You’ll need a screwdriver set and a pair of tweezers.
- Remove the Joy-Con controllers and microSD card
- Use a screwdriver to remove the top, bottom, and side screws
- Open the game card cartridge flap to completely lift the rear panel (if it’s closed)
- Use tweezers to remove the microSD card reader
- Remove the shield plate
- Disconnect the battery and remove the heat sink
- Use your fingers to remove the headphone jack and game card reader
- Disconnect the ribbon and fan cables before removing the motherboard (CAUTION: don’t pull on the connectors by the wire as they can easily snap off)
- Install the new motherboard and assemble the Nintendo Switch
- Try to charge and turn on the console
NOTE: Obvious signs of motherboard damage include liquid residue, cracked or burned components, and corrosion. If you prefer to have the board repaired, call Nintendo at 1-800-255-3700 if your warranty is still valid, or visit an electronics shop near you to learn more.