![Oculus Blinking Red and Blue [HASSLE-FREE FIXES!]](https://pigtou.com/wp-content/uploads/2023/08/Oculus-Blinking-Red-and-Blue-HASSLE-FREE-FIXES.jpg)
Like most Virtual Reality (VR) headsets, Oculus devices display different indicator lights, each relaying certain information to the user. A solid red light indicates the device’s battery is low (below 15%), solid white means the screen is on, solid orange means the device is starting up, and solid green means the device is charging (above 95%).
However, suppose your Oculus device is blinking red and blue. In that case, you have an issue like a drained or damaged battery, a problem with the headset battery connection, a malfunctioning charging cable, a damaged charging port, overheating, or software glitches. Fortunately, here are some user-recommended steps to get your Oculus device functioning correctly again.
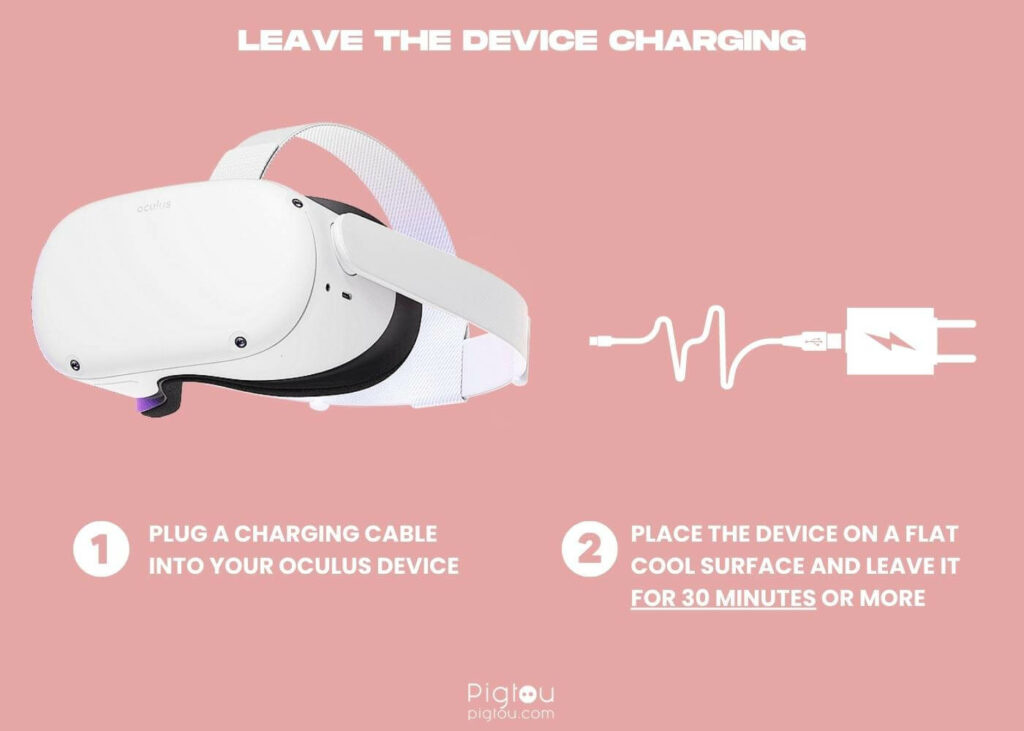
1. Leave the Device Charging and Wait
Your Oculus device may blink red and blue because the battery is low or completely drained. This usually happens when you’ve not used the device for long. The solution is to let the device charge without interruption.
- Plug a charging cable into your Oculus device
- Place the device on a flat cool surface and leave it for 30 minutes or more
- Check whether the red and blue lights have stopped blinking
2. Try a Forced Charge
If you’ve tried charging your device normally and it’s still blinking red and blue, attempt forced charging. This technique could get your Oculus device charging through unconventional means.
- Turn on the Oculus device if it has any battery power remaining
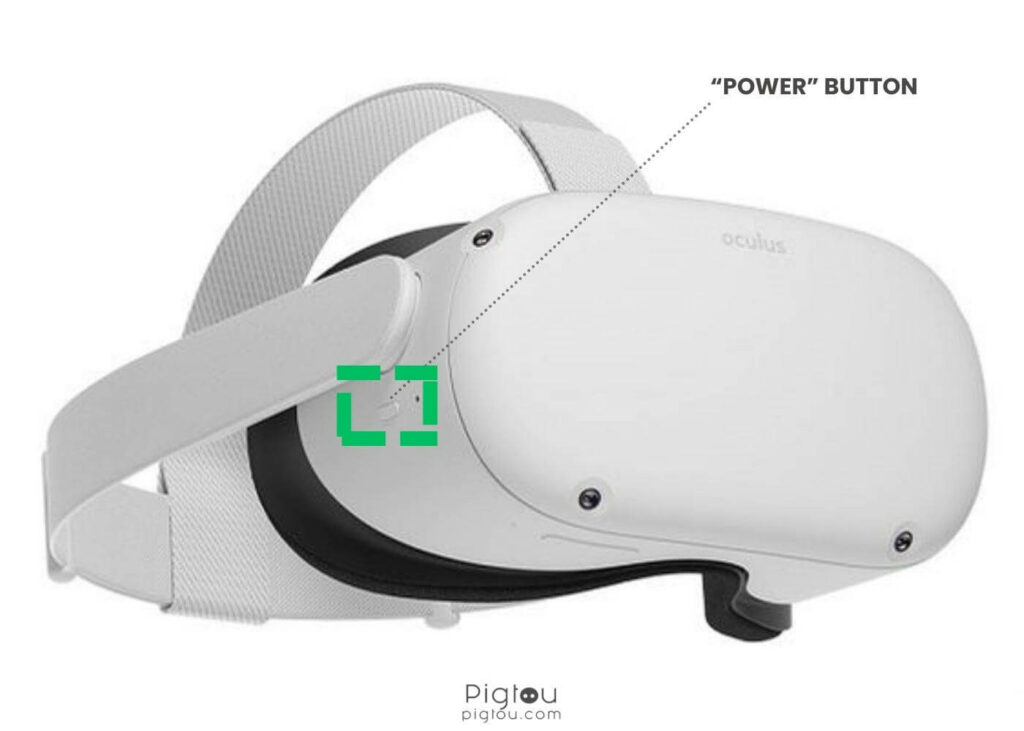
- Once the device is on, press and hold the “Power” button for about 20-30 seconds
- Plug the charging cable into the device
- Wait for the device to charge for about 30 minutes
- Press and hold the “Power” button for about 20-30 seconds while it’s still charging
- Wait for the battery meter to appear on the Head-Up Display (HUD) (the device is charging if an indicator light appears)
- If this doesn’t work on the first try, repeat the process one more time before proceeding to the next step
3. Check Your Charging Cable
If you’ve tried force-charging your Oculus device and it’s still blinking red and blue, the charger might not be working correctly, so you might need a new USB-C cable. Take these steps to establish whether your charging cable is faulty:
- Inspect the USB-C charging cable for any signs of damage or wear and tear
- Plug your official Oculus charging cable into your device
- Wiggle the cable or connect it to another adapter; if this doesn’t work, use another USB-C charging cable
- Leave it for several minutes to see whether the device will stop blinking red and blue
- Test both your official Oculus charging cable and the regular USB-C cable with another power outlet
- If your Oculus VR headset stops blinking red and blue after using the other USB-C charging cable, it means that the original Oculus charging cable is faulty or damaged; replace it with a new one
4. Check the Oculus Charger Adapter
Another charging accessory that may be causing your Oculus device to blink red and blue is the Oculus charger adapter. Using an adapter with the wrong specifications can cause problems with your device or ultimately damage it.
Follow these steps to check whether the adapter is the cause of the problem:
- Connect your device to your laptop or PC’s USB-C port
- Leave your Oculus device to charge for a couple of hours
- Check whether the two indicator lights are still blinking
- If charging your Oculus device using the computer’s USB port resolves the issue, your charger adapter is defective; replace it with a new official Oculus charger adapter
Note: Charging your Oculus device using a USB port on your computer or laptop is slower than using a charger adapter. Therefore, giving your Oculus headset several hours to charge before unplugging it is highly recommended. Also, some users report that connecting the charger block first and then the headset fixes the issue.
5. Check Your Headset for Overheating Issues
Your Oculus headset may be blinking red and blue due to overheating. Once your device’s battery becomes too hot, it will not accept any charge. This usually happens after long play periods.
- Unplug the charging cable from the device
- Press and hold down the “Power” button for five seconds to turn off the device
- Wait about 30 minutes for the Oculus headset to cool down
- Plug the charging cable back into the device
- Check whether the red and blue indicator lights have stopped blinking
Note: An overheated Oculus VR headset may or may not feel hot to the touch. Therefore, turning off the device once you stop using it is highly recommended to prevent overheating. To avoid overheating, you should also ensure the device is placed in a well-ventilated space while charging.
6. Perform a Hard Reboot
Sometimes your Oculus headset must restart to resolve software bugs and reload all programs needed for proper functioning. Note that a hard reboot doesn’t erase any stored data.
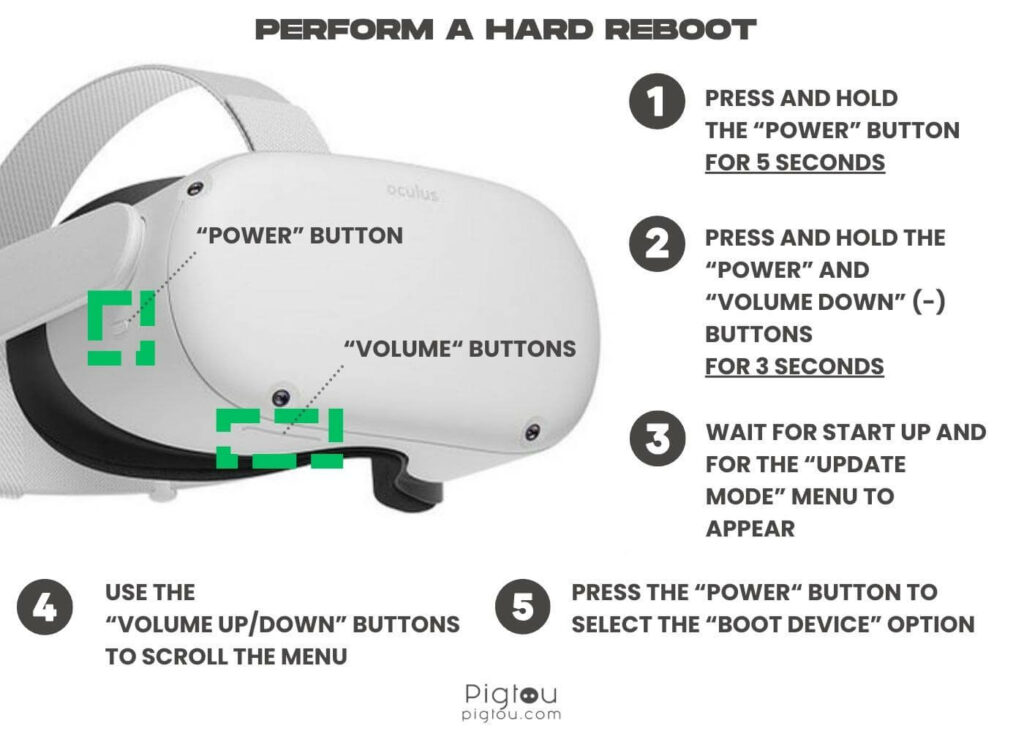
- Press and hold the “Power” button for five seconds to turn off the device
- Press and hold the “Power” and “Volume down” buttons on your device for about three seconds
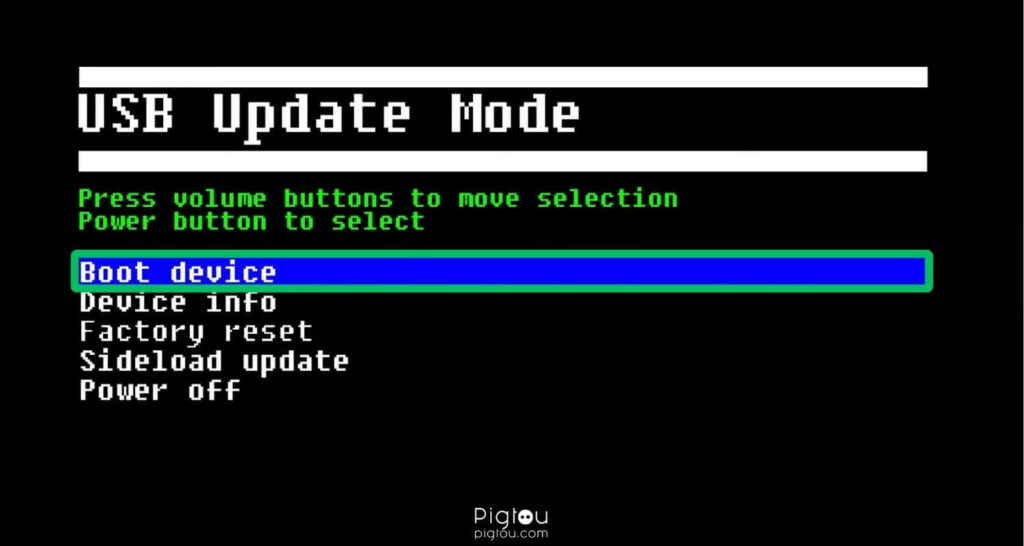
- Wait for your Oculus headset to start up and for the “Update Mode” menu to appear
- Use the “Volume up/down” buttons to scroll the menu
- Press the “Power button to select the “Boot Device” option
- Wait for your Oculus headset to restart normally
7. Perform a Factory Reset
If you’ve performed all the above steps and your Oculus VR headset is still blinking red and blue, perform a factory reset.
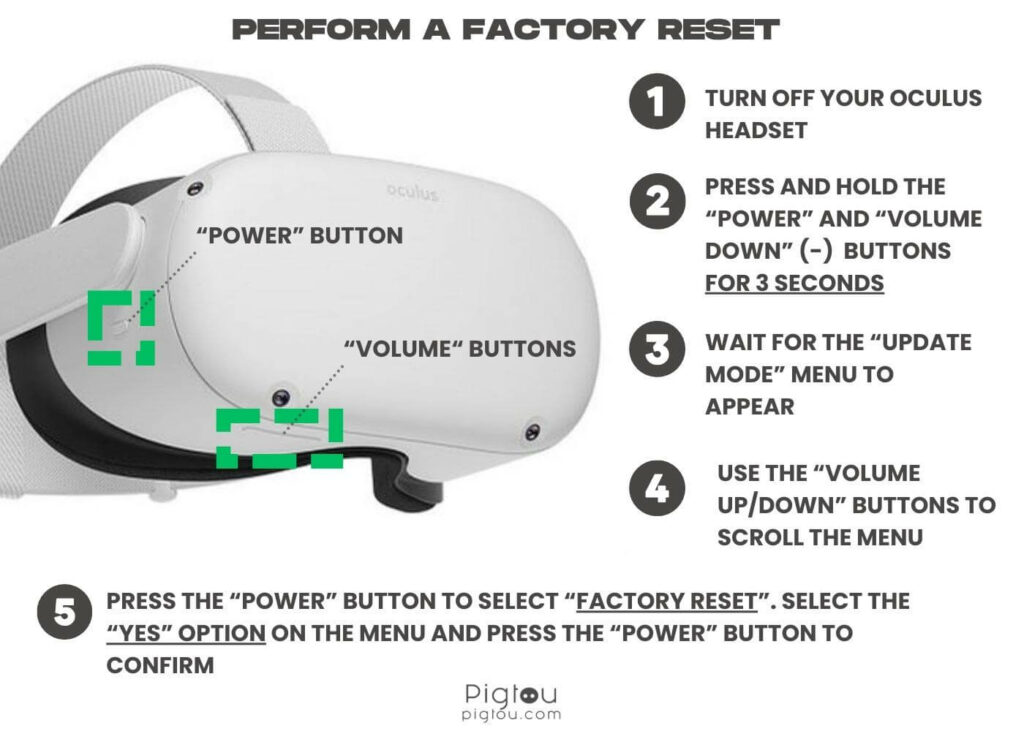
- Turn off your Oculus headset
- Press and hold the “Power” and “Volume down” buttons for about three seconds
- Wait for the “Update Mode” menu to appear
- Use the “Volume up/down” buttons to scroll the menu
- Press the “Power” button to select “Factory Reset”
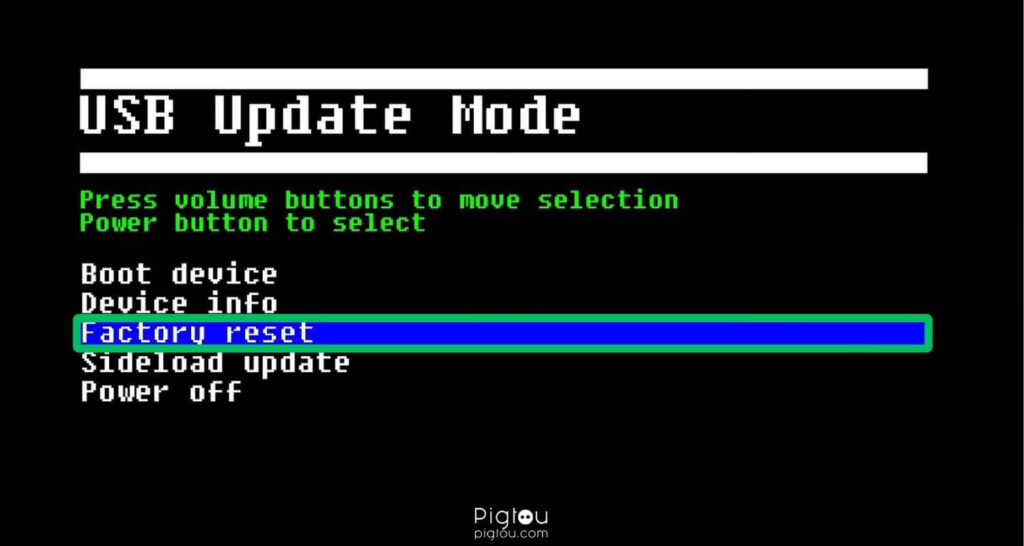
- Select the “Yes” option on the menu and press the “Power” button to confirm
NOTE: A factory reset will erase all the data stored on your Oculus VR headset, returning your device to how it was when you bought it.
8. Update Firmware
A pending software update could be causing your VR headset not to function correctly. By joining the QuestPublic Test Channel (PCT), you’ll get more updates sooner.
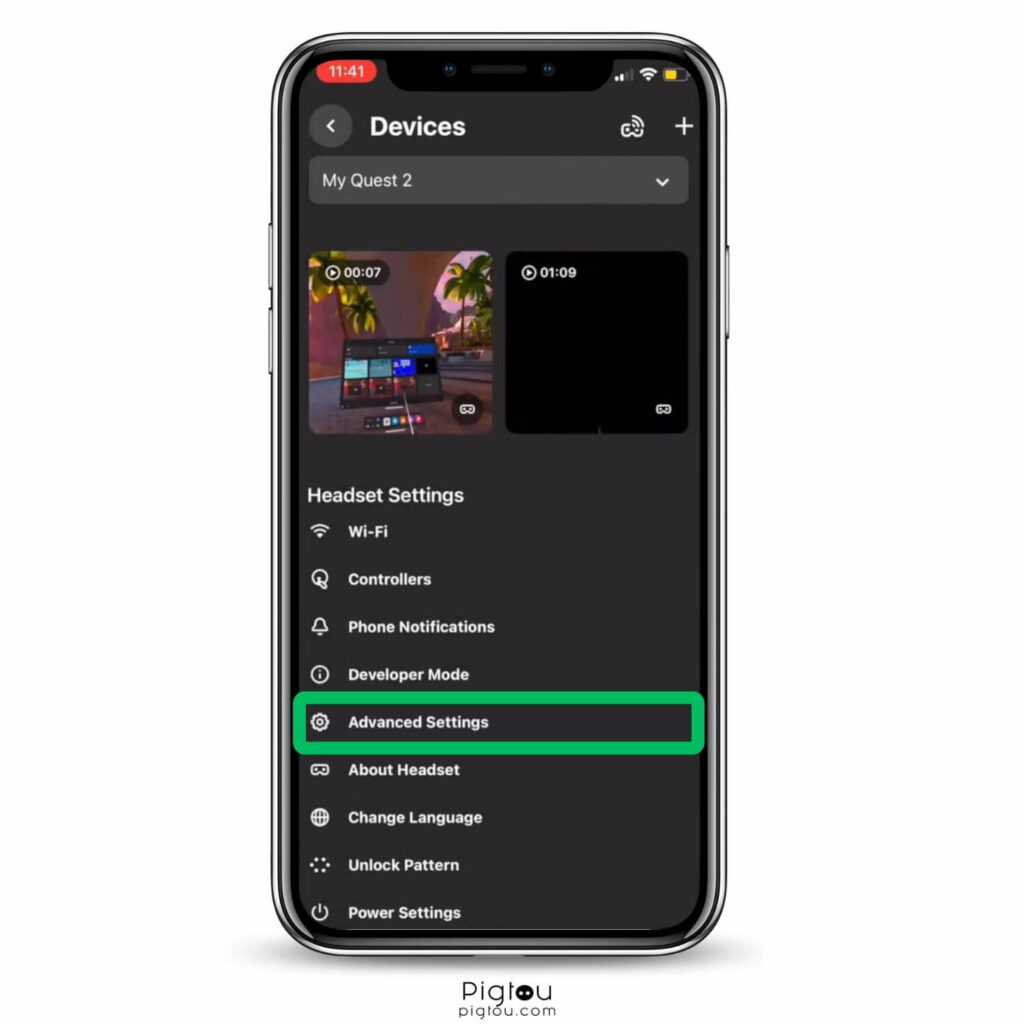
- Grab your phone and open the “Meta Quest” app
- Go to Menu > Devices > Advanced Settings
- Toggle the “Public Test Channel” to join QuestPTC (if toggling doesn’t work, the QuestPTC is full and unavailable)
9. Contact Support
You might be eligible for a repair or replacement depending on where you bought your VR headset and warranty details.
- Check your VR’s serial number (located at the back of the device)
- Open Meta support page
- Select the topic related to the issue you’re experiencing
- Provide all necessary information, including your serial number