
The snip and sketch tool has been a lifesaver for many, but things could have only been easier if the snips could automatically get saved. Most have found it bothersome that the screenshot snips only get saved on the clipboard. And many others don’t even understand how to manage the snips saved on the clipboard.
How could one access it when the snips disappear as soon as they are captured? The Windows OS has generally been a customizable system for many, and we love it. But while it’s so easy to manage most systems, why can’t the snips just get saved into a folder? Well, it could be saved into a folder. However, first, getting the right info is always key.
Yes, it would have been delightful for Windows to make an update that makes the navigation easier. Regardless, who says you can’t still keep the ball rolling? Join us below as we take you through all the right steps needed to get your snips saved.
Saving Your Snips (All The Steps You Need)
Screenshots are one cool way to get external images saved to your computers, especially when they are not so easy to download. And for PCs, the snip and sketch tool is just the man for the job. It’s fairly easy to use, but the issue with it can get pretty bothersome.
We want to get the snip images saved into a distinct folder. Can’t we have that? Of course, we can, just that the snip and sketch system was created so that unless you access the S&S notification, you could as well say bye to your snips.
Notwithstanding, even when this is a troublesome smudge Windows could have rectified, there are still ways to go about getting your snips saved:
Solution #1: Go Ahead and Switch On The Notifications For The S&S Tool
If you want to get around saving your snips, one thing you should be ready to do is to enable the notifications for your snip and sketch usage. It helps to note that you can only save your snips by clicking on the notification pop-ups. As some have this feature disabled, saving most snips is even harder. So, it helps to activate it. Below are the steps to follow:
Step 1: Move your cursor towards the Start key and press down on it by clicking the right of your mouse. Find your way to Settings and choose it too.
Step 2: Select the “System” option, and then click on it. Now, move to the left corner of the screen to press down on the “Notifications and Actions” option.
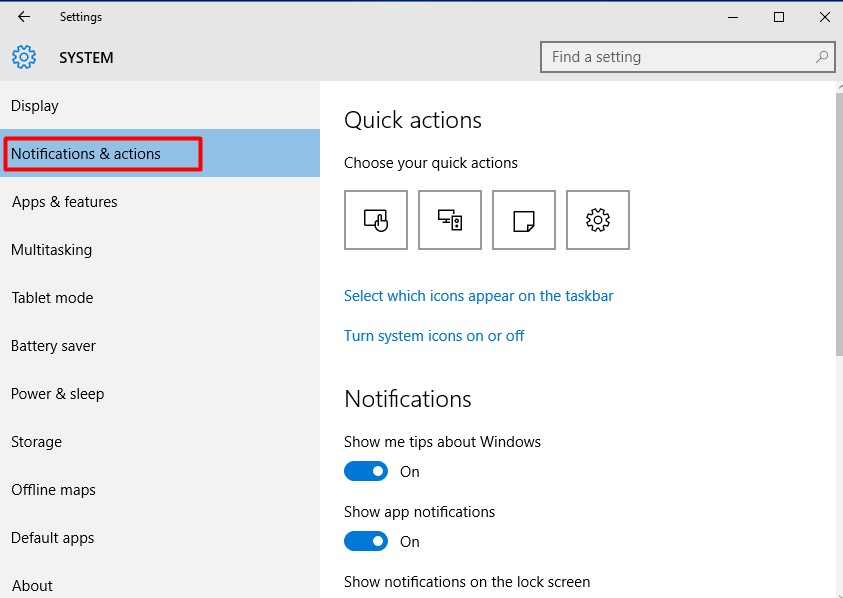
Step 3: Check if the Notifications option is ticked on. If not, ensure to tick it on.
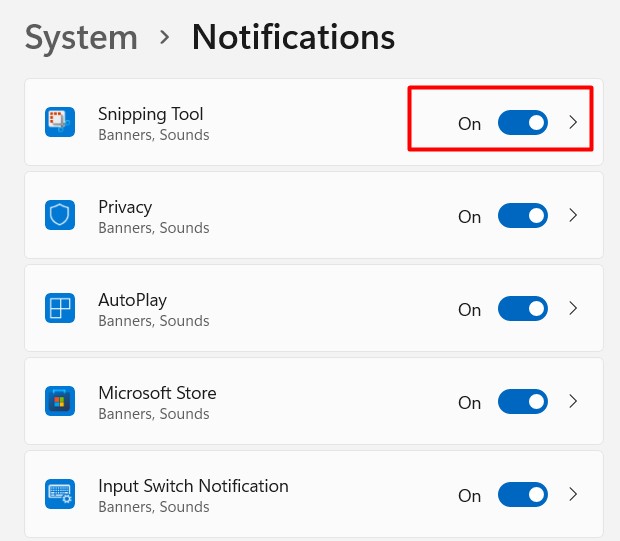
Step 4: Now, move your cursor down to the Snip And Sketch Option.
Step 5: You should “tick on” the notifications option for the software.
You should be able to spot the notifications context page popping up now whenever you use your snip and sketch tool. And once you see the notification make sure to select it.
Solution #2: Make Sure Your Auto-copy To Clipboard Is Activated
It’s also possible to have issues with your snips being saved even when the notification option is turned on. No matter how much you click the notice, nothing comes up. Often, this is because your snips might not be getting copied to the clipboard in the first place.
So, to activate your clipboard’s auto-copy, do follow these steps:
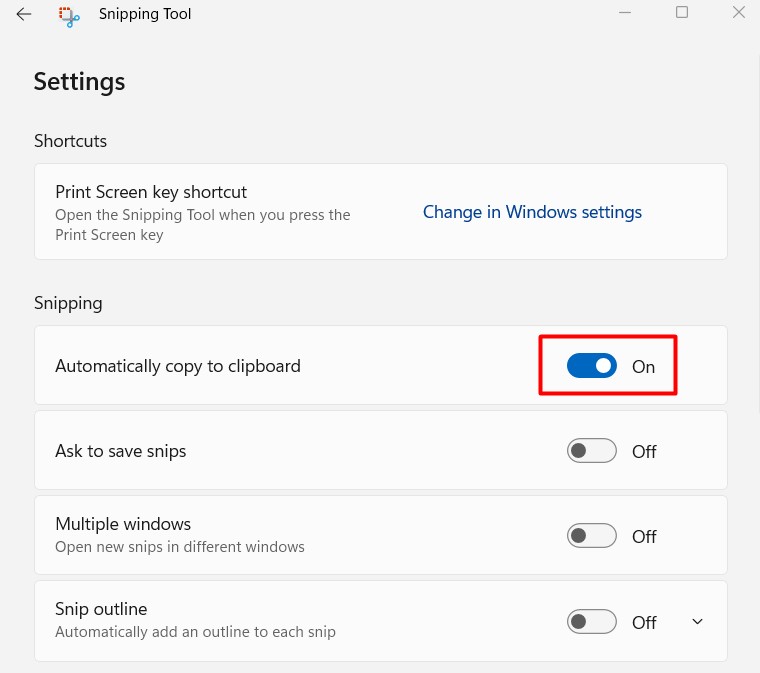
Step 1: Find your Win search option and press the word “Snip and Sketch” in it.
Step 2: You should be able to access the app once you press “Enter.” And now, move your cursor forward to the “See more” option. Select it, move down the context page that pops up, and choose “Settings.”
Step 3: On the right side of the screen, move your cursor to “tick on” the Auto-copy to Clipboard option.
Solution #3: If You Want It Saved, Then You Should Save It
You should know that enabling your clipboard auto-copy and your notifications option is not enough to get your ships saved. Sure doing them is essential, but to get your snips saved in a particular folder, you must go manual. That is, save the snips yourself.
Step 1: To activate the Snip and Sketch application, you must press the Windows key and the shift button together and down on the S key.
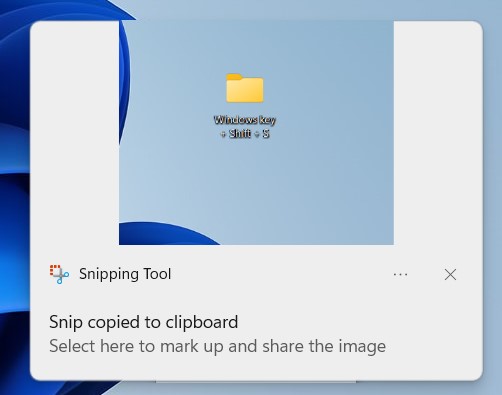
Step 2: After the app is opened, you can now take the shot you want to take.
Step 3: Now, click on the notification and move your cursor up the screen to the Save As option.
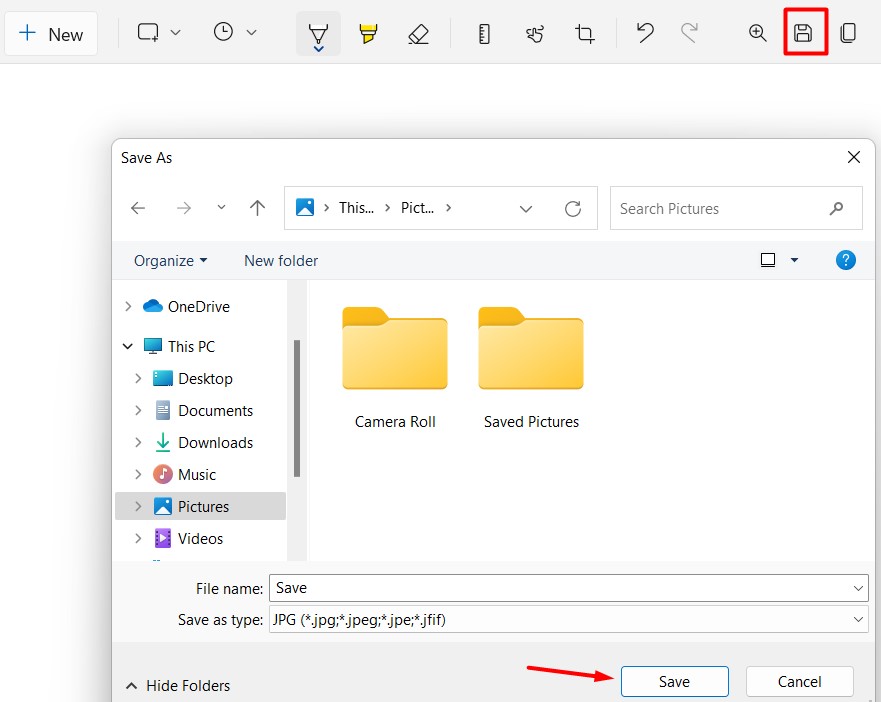
Step 4: Choose the location you prefer the snip to be in, and then go ahead and save it.
And you are done.
Solution #4: You Could Find Your Snips In A Specific Folder Too
Finding your snips through this procedure might not be the most smooth one, but it works just fine to keep your snips from disappearing forever too. So, except you prefer the good ol’ print screen method, here is another way to go about saving your snip:
Step 1: Access the image you want to take a shot off, and then take your snip.
Step 2: Now, scroll over to the notification pop-up and access it ( you can always close the notice page after this, but make sure you get it opened first because the opening action is primary to your system saving the snip.)
Step 3: Go ahead and press the Windows button now and simultaneously hold down on the E key to access File Explorer. Or you could as well manually access your File, Explorer.
Step 4: The File Explorer has a lot of tabs, so scroll over and access the “View” tab. Now, under it, you will find some unchecked boxes in the right corner of the screen. Check the square that states “Hidden items.”
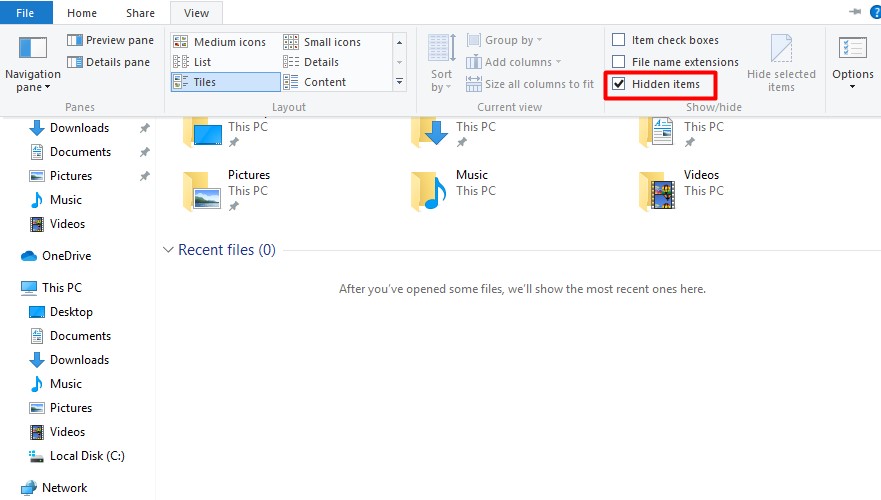
Step 5: The next thing you should do now is to paste this location into your search bar: %LOCALAPPDATA%\\Packages\\Microsoft.ScreenSketch_8wekyb3d8bbwe\\TempState. Or, if you want, you could find your way to it manually.
You will easily find your snips in the location.
Solution #5: Your Clipboard History Could Also Help
If you do not want to access your notifications every time, activating your clipboard history could be one way to save your snips. Doing this helps your clipboard keep a record of your snips.
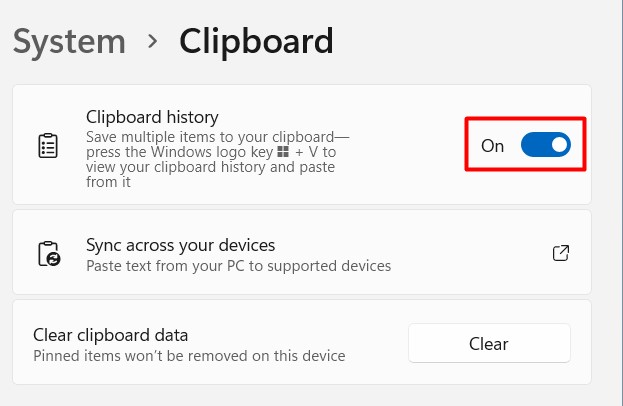
Step 1: From your Start context menu, find your way to the settings option and access it.
Step 2: Scroll through the resulting page, and you should be able to find the “System” option.
Step 3: Access the option and scroll over to “Clipboard.” Select it, and at the right side of the screen, go ahead and switch on the “Clipboard history” button.
And there you have it!
Reasons For The “Where Does Snip And Sketch Save” Issues?
It often has to do with the settings issue. And as this article has stated in its solutions, a few clicks around the system could get you going. Nonetheless, it’s still quite a point that Windows could have made using the Snip and Sketch app a bit easier.
Conclusion
The snip and sketch app has been around for a while. It’s easy to access and serves its purpose well. Frankly, having an auto-save feature could have only been a plus for the app, as it’s already a favorite out of many others like it.
Still and all, most steps needed to access the S&S app are pretty easy to run through. Hence, to get the best result, carefully go over the solutions above.
Frequently Asked Questions (FAQs)
You simply won’t be able to use your snips when you need them.
Putting on your Snip and Save notification, accessing some particular locations, manually saving your snip, and so on. This guide has provided more explanation on these solutions above.