![Hisense Roku TV Red Light Blinks 3 Times [REAL FIX]](https://pigtou.com/wp-content/uploads/2023/06/Hisense-Roku-TV-Red-Light-Blinks-3-Times-REAL-FIX.jpg)
It’s a frustrating experience when you want to watch your favorite TV show or play games on your console, only for the TV to refuse to turn on. When your Hisense Roku TV blinks three times, it’s usually because of an error linked to the power supply (PSU) board, capacitor, or LED strips. This means that the TV could be damaged.
But don’t worry; there are several fixes you could try to restore your TV to normal functioning. This article gives several user-recommended solutions for resolving the error.
1) Reset Your TV

This should always be the first step to try when your TV starts displaying any “red light blinking” errors.
- Plug out the TV from the wall
- Wait about 60 seconds
- Plug it back in
- Turn the TV on and check whether the issue is resolved
2) Factory Reset Your TV
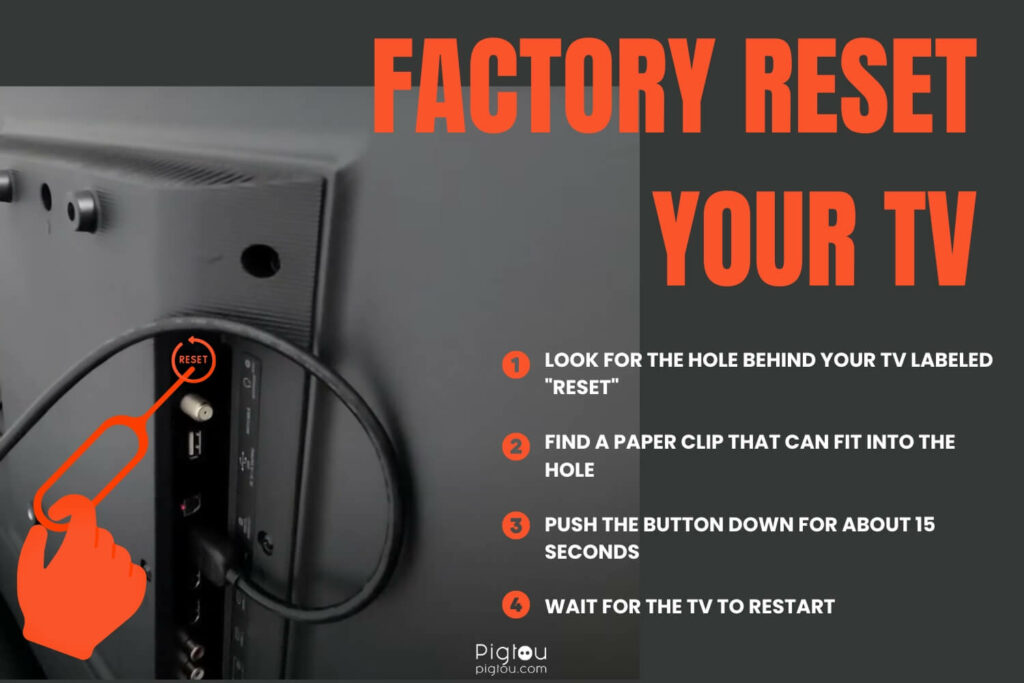
This fixes major software glitches and resets your TV to what it was when you bought it.
- Look for the hole behind your TV labeled “Reset”
- Find a paper clip that can fit into the hole
- Push the button down for about 15 seconds
- Wait for the TV to restart
RELATED: Hisense TV not turning on, red light blinks twice
3) Check the Power Supply Output Voltage and Replace the Power Supply Circuit
The common fault components of the standby voltage line supply to the mainboard are the capacitor (leakage), LDO IC, or DC-DC IC and its circuit, circuit loopholes, etc. This step requires a digital multimeter and little knowledge of electric circuits.
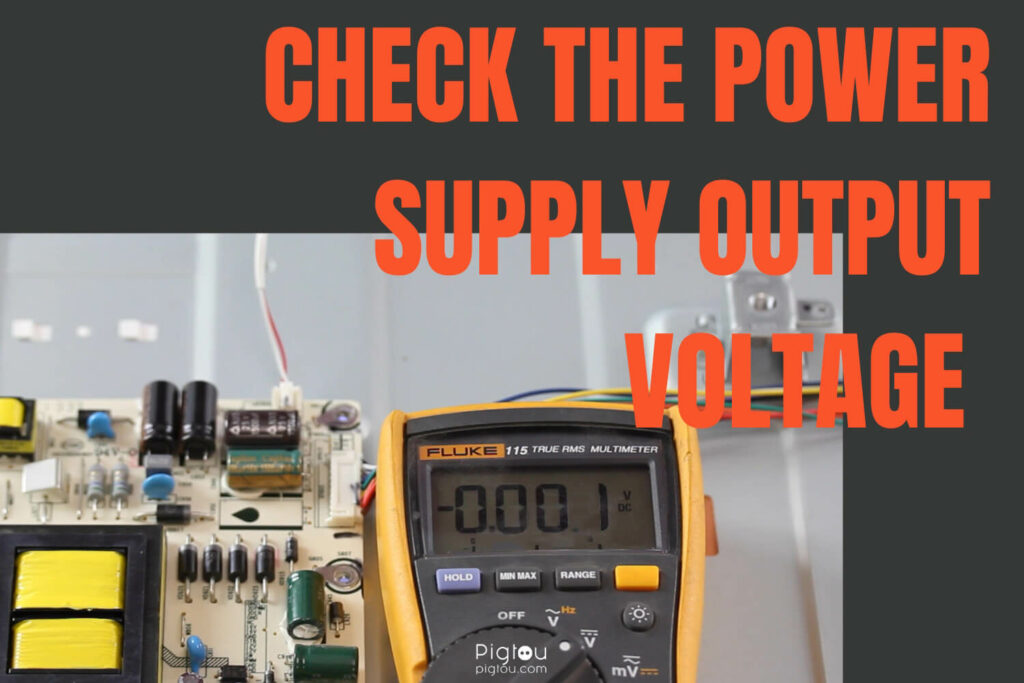
- Use the multimeter to check whether the output voltage is 5V (if the PSU standby voltage drops to 4.5V, the TV won’t start)
- If you discover the power voltage dropped to 4.5V or less, power off the TV and disconnect the cable from the mainboard
- Check again to confirm whether the standby voltage is still the same or not
- If it’s still the same [4.5V], this confirms that the problem is the power supply standby output drop; replace the PSU board or the electrolytic capacitor (see below)
- When the PSU standby voltage connected with a loader still has an output voltage of 5V, that means the problem is the TV’s mainboard input standby voltage line, so replace the PSU board (see below)
3.1) Replace the Power Supply Board
You’ll need a new power board and a screwdriver set. Follow the steps below to properly and safely replace your TV’s internal power board.
- Have the TV’s screen side resting down on a soft surface
- Remove all the screws on the back panel, including those on and underneath the base
- Place the screws somewhere in an organized manner so that you’ll know what screw goes in the same holes they came out of
- It should be extremely easy to pull up the back panel, but if it’s not, check whether you’re missing a screw and remove it
- Look for the two connection points in the PSU board (one on the upper right and the other on the upper left) and carefully disconnect them by pushing in on each of the tabs, compressing them, and shifting them out
- Remove all the screws on the PSU board; there should be four around the board’s corners and two more on the power connection
- Carefully shift the power board up and off
- Carefully remove the new powerboard from the box and unwrap it from the packaging
- Check whether the new board has the connection point that feeds to the upper right portion; if it does, go to the TV and carefully remove the connection
- Gently rest the new power board in place
- Grab the screws and secure the board to the aluminum panel (do your best not to cross-thread them; they should go in smoothly)
- Reattach the orange connections until they secure with the outer tabs
- Grab the back panel, carefully align it, and then rest it in place
- Before you start attaching any screws, ensure all the screw holes are visible
- Reattach all the screws around the back panel and be careful not to over-tighten them
- Insert and secure the base
- Attach the power cord and plug it into a power source
- Turn on the TV and check whether the issue is resolved
NOTE: Before buying a new power board, ensure the part number matches what’s on your TV. Don’t use the TV’s model number.
3.2) Check and Replace Blown Capacitors

You’ll require replacement capacitors (they could be a higher voltage but not lower voltage), a soldering kit, a desoldering pump, a 20k ohm resistor, and a screwdriver set.
- Turn the TV off and let it sit for about 30 minutes (to avoid the risk of electric shock) before removing the back cover
- Look for the capacitors with their tops popping off (this indicates that they’re blown)
- Use the screwdriver to unscrew the circuit board and remove the tabs (be careful not to touch a power cord as it might still have an electric current)
- Run a 20k ohm resistor across the capacitor terminals to discharge any electric current left
- Use a desoldering pump to remove the blown capacitors from the circuit board
- Take the new capacitors and solder them on the spots where you removed the old ones (make sure to check the terminals of the capacitors when soldering)
- Screw the circuit board back into its place
- Reattach the TV’s back cover and turn it on
4) Replace Bad LED Strips
For this step, you’ll need replacement LED strips, a screwdriver set, duct tape, and suction cups. We recommend taking pictures during the repair process as a reference point and ensuring the TV is unplugged.
- Remove the screws and the back cover off the TV
- Disconnect the ribbon cables from the scan drive board
- Pry the bezel from the chassis and remove it
- Release the scan drive boards, then gently flip them up and tape them to the panel
- Using suction cups, carefully lift and remove the panel from the chassis
- Release and remove the filter frame around the chassis
- Tape the corners on the layers of diffusion to keep them together
- Remove the layers of diffusion from the chassis
- Remove the tabs that hold the reflector sheet to the chassis
- Lift and remove the reflector sheet
- Disconnect the power cables on the LED strips and then remove the LED strips from the chassis
- Take the replacement strips and align them on the chassis
- Reinstall the reflector sheet and the tabs that hold it in place
- Reinstall the layers of diffusion and remove the tape in the corners
- Reinstall the filter frame
- Reinstall the TV panel and remove the suction cups
- Release the scan drive boards and realign them in the clips
- Reinstall the bezel
- Reconnect the T-CON board to the scan drive boards
- Reinstall the back cover and the screws
- Plug the TV into a power source and turn it on
5) Use Your Warranty
If your TV is new and the warranty is still valid, we advise you to contact Hisense for professional help repairing your TV or to get a replacement.
- Go to their official website
- Chat with the support or call +1 (888) 935-8880
- Follow the instructions you’ll be given, which involve registering your TV and filling in your details
- Drop off the TV at the nearest store
- Wait for it to be repaired or for a replacement to be delivered to your address
6) Get a New LED TV
If your warranty has expired and it would cost a lot to fix the current TV, it would be best to buy another LED TV.
Check out our recommended TVs:


, Black")
FIX OTHER HISENSE TV ISSUES:
– No sound
– No WiFi
– Roku remote’s on/off button not working